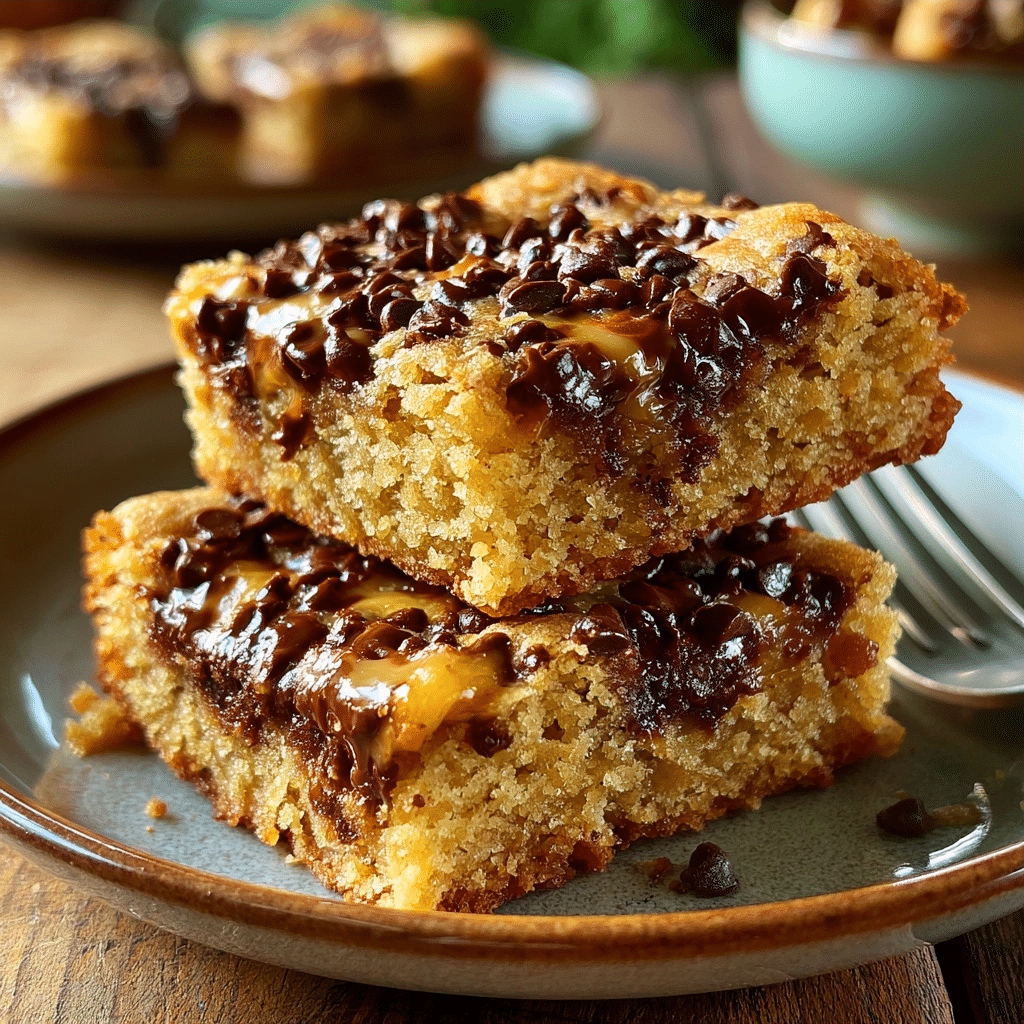
Chocolate Chip Cookie Bars are the ultimate easy dessert that delivers all the flavor of classic cookies without the fuss of scooping. These soft, chewy bars have a buttery richness and melty chocolate in every bite, perfect for feeding a crowd or satisfying a sudden craving.
| Prep Time | Cook Time | Total Time | Servings | Difficulty | Cuisine |
|---|---|---|---|---|---|
| 15 mins | 25 mins | 40 mins | 16 bars | Easy | American |
Why This Recipe Works
I have tested dozens of cookie bar recipes, and this one stands out for its perfect balance of texture and simplicity. The combination of granulated and brown sugar creates a chewy interior with caramel notes, while the high butter content ensures a tender crumb. You get the satisfaction of a chocolate chip cookie without rolling individual balls—just press the dough into a pan and bake.
Another reason I love this recipe is its forgiving nature. Even if you overmix slightly or bake a minute too long, the bars remain soft and delicious. The one-pan method also means less cleanup, making it my go-to for potlucks and last-minute dessert emergencies.
Ingredients
| Ingredient | Quantity | Notes with Alternatives |
|---|---|---|
| Unsalted butter | 1 cup (2 sticks) | Softened; salted butter works but reduce added salt to ½ tsp |
| Granulated sugar | 1 cup | Adds crispness; can substitute coconut sugar |
| Brown sugar | 1 cup, packed | Light or dark; dark gives deeper molasses flavor |
| Eggs | 2 large | Room temperature for best emulsion |
| Vanilla extract | 2 tsp | Pure vanilla preferred; imitation works |
| All-purpose flour | 3 cups | Measured correctly; can substitute 1:1 gluten-free blend |
| Baking soda | 1 tsp | Leavening; ensure fresh for proper rise |
| Salt | 1 tsp | Fine sea salt or kosher |
| Semi-sweet chocolate chips | 2 cups | Milk, dark, or white chips; chop a bar for puddles |
Step-by-Step Instructions
Preparing the Dough
- Cream the softened butter, granulated sugar, and brown sugar in a large bowl until light and fluffy, about 2 minutes.
- Beat in the eggs one at a time, ensuring each is fully incorporated, then add the vanilla extract.
- Whisk together the flour, baking soda, and salt in a separate bowl to distribute leavening evenly.
- Gradually add the dry ingredients to the wet mixture, mixing on low speed until just combined—do not overmix.
- Fold in the chocolate chips with a spatula, reserving a handful to press on top for visual appeal.
Baking the Bars
- Preheat your oven to 350°F (175°C) and line a 9×13-inch baking pan with parchment paper or grease it well.
- Spread the dough evenly into the prepared pan using an offset spatula or your hands. Press a few extra chips on top.
- Bake for 20 to 25 minutes, until the edges are golden brown and the center appears set but still soft to the touch.
- Remove from oven and place the pan on a wire rack. Cool completely in the pan—this is crucial for clean slices.
Cutting and Serving
- Once fully cooled, lift the bars out using the parchment overhang and place on a cutting board.
- Use a sharp chef’s knife to cut into 16 even squares, wiping the blade clean between cuts for neat edges.
Chef Tips for Perfect Results
- Use room-temperature butter and eggs to create a smooth emulsion that traps air, giving a lighter texture. Cold ingredients can cause the dough to stiffen and lead to dense bars.
- Measure flour by spooning it into the measuring cup and leveling off. Scooping directly compacts the flour, resulting in dry, crumbly bars.
- Chill the dough for 15 minutes if your kitchen is warm—this prevents excessive spreading and keeps the bars from becoming too thin.
- Bake until the edges are set but the center still looks slightly underdone. The residual heat will finish cooking the center while cooling, ensuring a soft, chewy interior.
- Cool completely in the pan before cutting. Cutting too early causes the bars to fall apart and lose their clean corners.
Common Mistakes to Avoid
- Overbaking the bars: If the center looks fully firm when you pull them out, they will become hard as they cool. Bake until the edges are golden and the center is just set—about 22 minutes for most ovens. Use a toothpick: moist crumbs, not wet batter, are the goal.
- Using cold butter: Cold butter doesn’t cream properly, leading to a dense, greasy texture. Always leave butter out for 30–60 minutes before starting. If short on time, microwave in 5-second bursts until softened but not melted.
- Overmixing the dough: Developing too much gluten makes tough, cakey bars instead of tender ones. Stop mixing as soon as the flour streaks disappear—fold the chips by hand.
- Skipping the parchment paper: Without parchment, the bars stick to the pan and are difficult to remove cleanly. Line the pan with parchment, leaving an overhang on two sides for easy lifting.
Variations and Substitutions
| Ingredient | Substitution | Impact on Flavor |
|---|---|---|
| Chocolate chips | White chocolate chips, butterscotch chips, or chopped nuts | White chocolate adds sweetness; butterscotch gives caramel notes; nuts add crunch |
| Granulated sugar | Coconut sugar or brown sugar (all brown) | Coconut sugar adds mild caramel; all brown sugar makes bars very soft and chewy |
| All-purpose flour | Whole wheat flour (use 2¼ cups) | Whole wheat adds nutty flavor and denser texture; reduce slightly for moisture |
| Butter | Melted coconut oil (use ¾ cup) | Coconut oil yields a slightly different crumb with subtle coconut flavor |
| Eggs | Flax eggs (2 tbsp ground flax + 6 tbsp water) | Flax eggs make bars more cakey and delicate; best for vegan adaptation |
Serving Suggestions and Pairings
Chocolate Chip Cookie Bars are incredibly versatile. Serve them warm with a scoop of vanilla bean ice cream and a drizzle of hot fudge for an indulgent sundae. For a casual coffee break, pair a bar with a cold glass of milk or a latte. They also shine at bake sales, potlucks, or as a simple dessert after dinner. For holidays, top with a sprinkle of flaky sea salt or dust with powdered sugar.
Storage and Reheating
| Method | Duration | Instructions |
|---|---|---|
| Room temperature | Up to 4 days | Store in an airtight container with parchment between layers to prevent sticking. |
| Refrigerator | Up to 1 week | Place in a sealed container; bring to room temperature before serving for best texture. |
| Freezer | Up to 3 months | Wrap individually in plastic wrap, then place in a zip-top bag. Thaw at room temperature 30 minutes. |
| Reheating | 10–15 seconds | Microwave a single bar for 10–15 seconds to restore that just-baked softness. |
Nutritional Information
Approximate values per bar (based on 16 servings).
| Nutrient | Amount per Serving |
|---|---|
| Calories | 250 kcal |
| Protein | 3 g |
| Total Fat | 14 g |
| Saturated Fat | 8 g |
| Carbohydrates | 32 g |
| Fiber | 1 g |
| Sugar | 20 g |
| Sodium | 150 mg |
Frequently Asked Questions
Can I use a different type of chocolate in Chocolate Chip Cookie Bars?
Yes, you can substitute semi-sweet chips with milk chocolate for sweeter bars or dark chocolate for a richer taste. White chocolate or peanut butter chips also work well. Keep the total amount at 2 cups to maintain the dough ratio.
How do I know when Chocolate Chip Cookie Bars are done?
The bars are done when the edges are golden brown and the center appears slightly soft but not jiggly. Insert a toothpick into the center—it should come out with a few moist crumbs, not wet batter. Overbaking leads to dry bars.
Why did my Chocolate Chip Cookie Bars turn out too hard?
Hard bars usually result from overbaking or overmixing the dough. Bake until just set, and mix only until the flour disappears. Also, using too much flour (scooping directly) can dry them out—always spoon and level.
Can I make the dough ahead and bake later?
Absolutely. Prepare the dough, press it into the pan, cover tightly with plastic wrap, and refrigerate for up to 48 hours. You can also freeze the dough for up to 3 months; thaw overnight in the fridge before baking. Add 2–3 minutes to baking time if starting from cold.
How should I serve Chocolate Chip Cookie Bars for a party?
Cut the bars into small squares and arrange on a platter. For extra flair, drizzle with melted chocolate or caramel sauce and sprinkle with sea salt. They pair wonderfully with coffee, milk, or even a light dessert wine substitute like sparkling apple cider.
Conclusion
Chocolate Chip Cookie Bars are the perfect marriage of convenience and comfort. With a soft, chewy center, crisp edges, and pockets of melted chocolate, they deliver everything you love about homemade cookies without the extra effort. This recipe is foolproof, scalable, and endlessly adaptable—try it once, and it will become your go-to dessert. For more trusted baking resources, visit King Arthur Flour’s baking guide and Serious Eats’ dessert tips. The signature buttery, chocolatey flavor will keep everyone coming back for more.
PrintChocolate Chip Cookie Bars

These soft, chewy chocolate chip cookie bars deliver the rich buttery flavor and melty chocolate of classic cookies, all in one easy-to-prepare bar perfect for any gathering or dessert craving.
- Prep Time: 15
- Cook Time: 25
- Total Time: 40
- Yield: 16 bars
- Category: recipe index
- Method: Baking
- Cuisine: American
- Diet: Vegetarian
Ingredients
1 cup (2 sticks) unsalted butter, softened
1 cup granulated sugar
1 cup brown sugar, packed
2 large eggs
2 tsp vanilla extract
3 cups all-purpose flour
1 tsp baking soda
1 tsp salt
2 cups semi-sweet chocolate chips
Instructions
Preheat oven to 350°F (175°C)
Line an 13×9-inch baking pan with parchment paper
In a large bowl, cream butter, granulated sugar, and brown sugar until light and fluffy
Beat in eggs one at a time, then add vanilla extract
In a separate bowl, whisk together flour, baking soda, and salt
Gradually add the dry ingredients to the wet mixture, mixing on low speed until just combined
Fold in chocolate chips with a spatula
Spread the dough evenly into the prepared baking pan
Bake for 25 minutes or until golden brown
Let cool completely before cutting into 16 bars
Notes
Use salted butter? Reduce added salt to ½ tsp.
For a gluten-free version, substitute all-purpose flour with a 1:1 gluten-free flour blend
Store in an airtight container at room temperature for up to 5 days