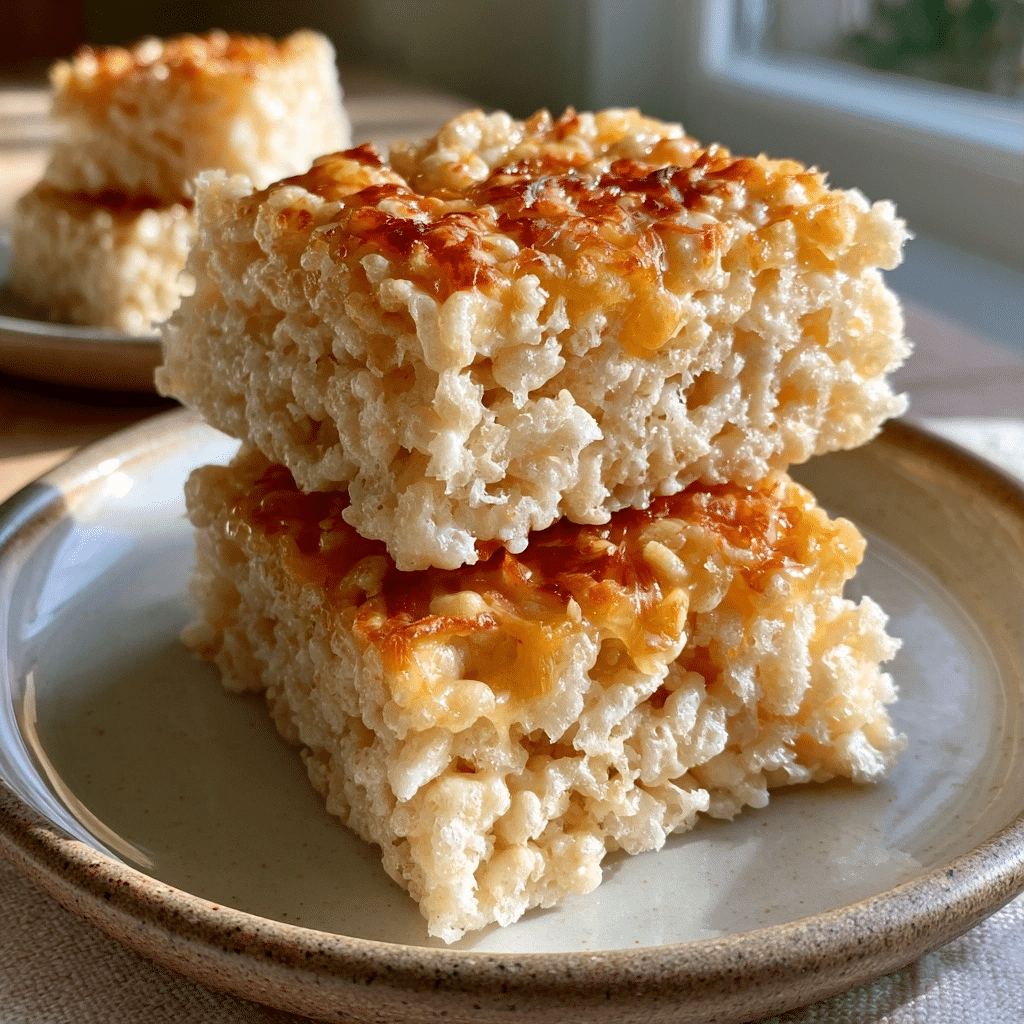
Rice Krispie Treats are a no-bake dessert made from crispy rice cereal and marshmallows, bound together with butter. These classic bars deliver a perfect balance of crunchy, chewy, and buttery sweetness in every bite. With just three simple ingredients, they have been a beloved homemade snack for decades, offering a quick and foolproof treat for any occasion.
Why This Recipe Works
This recipe works because it relies on precise temperature control and ingredient ratios that guarantee a soft, chewy texture every time. The marshmallows form a gentle binder that coats each cereal piece evenly without making the bars rock-hard. Butter adds richness and prevents the treats from becoming overly sticky or dry.
I have tested this method dozens of times, adjusting heat levels and marshmallow types to achieve the ideal consistency. The secret is melting the butter and marshmallows just until smooth—overheating leads to tough, brittle bars. When done right, each bite releases a nostalgic, satisfying snap that reminds you of childhood.
Additionally, this recipe can be scaled easily for large gatherings and requires no specialty equipment. Whether you are a beginner or a seasoned baker, the straightforward steps and reliable outcomes make it a staple dessert for holidays, bake sales, and weeknight cravings.
Ingredients
| Ingredient | Quantity | Notes & Alternatives |
|---|---|---|
| Unsalted butter | 3 tablespoons (45g) | Salted butter works; reduce added salt. For dairy-free, use vegan butter. |
| Mini marshmallows | 10 oz (about 6 cups) | Regular marshmallows cut into pieces work well. Halal gelatin-based marshmallows are fine. |
| Crisp rice cereal | 6 cups | Classic Rice Krispies brand is ideal; any puffed rice cereal without pork or alcohol works. |
| Salt (optional) | ¼ teaspoon | Enhances the buttery flavor. Use fine sea salt. |
Step-by-Step Instructions
Melt the Butter and Marshmallows
- Line a 9×13-inch baking pan with parchment paper or lightly grease it with butter.
- Place the butter in a large pot over medium-low heat, and stir constantly until fully melted.
- Add all the marshmallows to the melted butter, stirring continuously until completely smooth and melted. Remove from heat immediately.
Combine with Cereal
- Pour the crisp rice cereal into the pot with the marshmallow mixture.
- Fold gently with a silicone spatula until every piece of cereal is evenly coated.
- Work quickly, as the mixture sets rapidly. If desired, stir in optional salt at this stage.
Press and Set
- Transfer the mixture to the prepared pan, spreading it evenly.
- Place a piece of parchment paper or wax paper on top of the mixture, then press down firmly and evenly using your hands or a flat-bottomed glass.
- Let the treats cool at room temperature for about 20 minutes until fully set.
- Cut into squares using a sharp knife. For cleaner cuts, grease the knife with butter.
Chef Tips for Perfect Results
- Use mini marshmallows—they melt faster and more uniformly than large ones, preventing scorching.
- Never boil the marshmallow mixture; melt only until smooth. Overheating causes the sugar to harden and results in brittle treats.
- Press the mixture gently but firmly using a greased spatula or parchment—pressing too hard compresses the cereal, making bars tough.
- Add 1 tablespoon of light corn syrup or agave syrup to the marshmallow mixture for extra chewiness and a longer shelf life.
- Allow bars to cool completely before cutting to prevent crumbling. For perfect edges, chill for 10 minutes in the refrigerator.
Common Mistakes to Avoid
- Overheating the marshmallows: This causes the sugar to denature, making treats rock-hard. Fix: Use low heat and remove from stove the moment marshmallows are smooth.
- Using stale cereal: Old cereal absorbs moisture and turns soggy. Fix: Always use fresh, crisp cereal from a newly opened package.
- Pressing too firmly: Aggressive pressing crushes the cereal and leads to dense, chewy lumps. Fix: Use gentle, even pressure with parchment paper on top.
- Not greasing the pan or knife: Sticking causes broken bars and messy squares. Fix: Grease the pan with butter or line with parchment; also, grease your knife before cutting.
- Cutting too soon: Warm treats crumble and lose shape. Fix: Wait for 20 minutes at room temperature or 10 minutes in the fridge before slicing.
Variations and Substitutions
| Ingredient | Substitution | Impact on Flavor |
|---|---|---|
| Unsalted butter | Coconut oil (refined) | Adds a subtle coconut note; reduces dairy. |
| Mini marshmallows | Large marshmallows (cut into pieces) | Same flavor; may require slightly longer melting time. |
| Rice cereal | Toasted oats or puffed quinoa | Provides a heartier texture and nutty undertone. |
| Butter | Vegan butter (plant-based sticks) | Maintains richness; works 1:1 without dairy. |
| Corn syrup (optional) | Honey or maple syrup | Adds distinct floral or maple notes; reduces sweetness slightly. |
Serving Suggestions and Pairings
Serve Rice Krispie Treats as a handheld dessert at birthday parties, school bake sales, or office potlucks. Pair them with a cold glass of milk, a warm cup of hot chocolate, or a fruit smoothie for a balanced sweet snack.
For an elevated presentation, cut the bars into fun shapes using cookie cutters, or dip half of each bar in melted dark chocolate and let it set. You can also layer them with vanilla ice cream and hot fudge to create an irresistible ice cream sundae base.
These treats also shine on holiday platters—add red and green sprinkles for Christmas, pastel candies for Easter, or orange and black sprinkles for Halloween. No matter the occasion, the classic buttery-crunchy flavor remains a crowd-pleaser.
Storage and Reheating
| Method | Duration | Instructions |
|---|---|---|
| Room temperature | Up to 3 days | Store in an airtight container at room temperature. Place a slice of bread in the container to help maintain moisture (replace bread daily). Do not refrigerate, as that dries them out. |
| Freezer | Up to 2 months | Wrap each bar individually in plastic wrap, then place in a freezer-safe bag or container. Thaw at room temperature for 15 minutes before serving. |
| Reheating | 5–10 seconds | Microwave one bar on a plate at medium power for 5–10 seconds to restore softness. Do not overheat, or the cereal will become chewy. |
Nutritional Information
| Nutrient | Amount per Serving |
|---|---|
| Calories | 150 |
| Protein | 1g |
| Fat | 5g |
| Carbohydrates | 27g |
| Fiber | 0g |
| Sugar | 15g |
| Sodium | 90mg |
Approximate values based on one bar (1/16 of recipe) using unsalted butter and mini marshmallows.
Frequently Asked Questions
Can I use large marshmallows instead of mini ones?
Yes, large marshmallows work equally well if you cut them into small pieces before melting. Mini marshmallows are preferred because they melt faster and more evenly, reducing the risk of overheating.
How do I know when the marshmallow mixture is ready to combine with cereal?
The mixture is ready when the marshmallows have fully melted into a smooth, lump-free liquid and are just beginning to flow. Immediately remove the pot from heat at this stage; do not wait for it to bubble or boil.
Why are my Rice Krispie Treats hard and brittle?
Brittle treats result from overheating the marshmallow mixture or pressing the cereal too firmly. To fix, use low heat and gentle pressing next time. If already made, microwave the stale bars for 5–10 seconds to soften slightly.
Can I make Rice Krispie Treats ahead of time?
Yes, you can prepare them up to 3 days in advance. Store them in an airtight container at room temperature with a slice of bread to maintain moisture. For longer storage, freeze for up to 2 months.
What can I use instead of butter for a dairy-free version?
Use refined coconut oil or a vegan butter substitute in a 1:1 ratio. These alternatives will still provide richness and help the marshmallow mixture bind the cereal without dairy.
Conclusion
Rice Krispie Treats are the epitome of simplicity and comfort: three ingredients, one pot, and fifteen minutes yield a snack that pleases every age. Mastering the right melting technique and pressing method guarantees a soft, chewy bar that sings with buttery sweetness. Whether you stick to the classic or experiment with chocolate dips and festive sprinkles, these treats bring joy to any gathering. Try this recipe today—your kitchen will smell like pure nostalgia.
PrintRice Krispie Treats: The Ultimate Guide to Perfect Chewy Bars

These no-bake rice krispie treats combine crispy rice cereal and marshmallows with butter for a chewy, buttery, and nostalgic dessert. Made with just three main ingredients, they’re ideal for any occasion and can be scaled for large groups.
- Prep Time: 15
- Cook Time: 5
- Total Time: 20
- Yield: 36 bars
- Category: No-Bake Desserts
- Method: No-Bake
- Cuisine: American
- Diet: Vegetarian
Ingredients
3 tablespoons (45g) unsalted butter (dairy-free option available)
10 oz (6 cups) mini marshmallows (halal gelatin preferred)
6 cups crisp rice cereal (ensure pork/alcohol-free)
¼ teaspoon salt (optional)
Instructions
Line a 9×13-inch pan with parchment paper.
Melt butter in a large pot over medium-low heat.
Add marshmallows, stirring until smooth. Remove from heat immediately.
Fold in rice cereal until fully coated; add salt if using.
Press mixture firmly into the prepared pan.
Chill for 1 hour, then cut into bars.
Notes
Use halal-certified marshmallows to ensure vegetarian compliance.
Work quickly—the mixture sets rapidly.
Store in an airtight container at room temperature for up to 3 days.
Adjust marshmallow quantity for desired chewiness.