
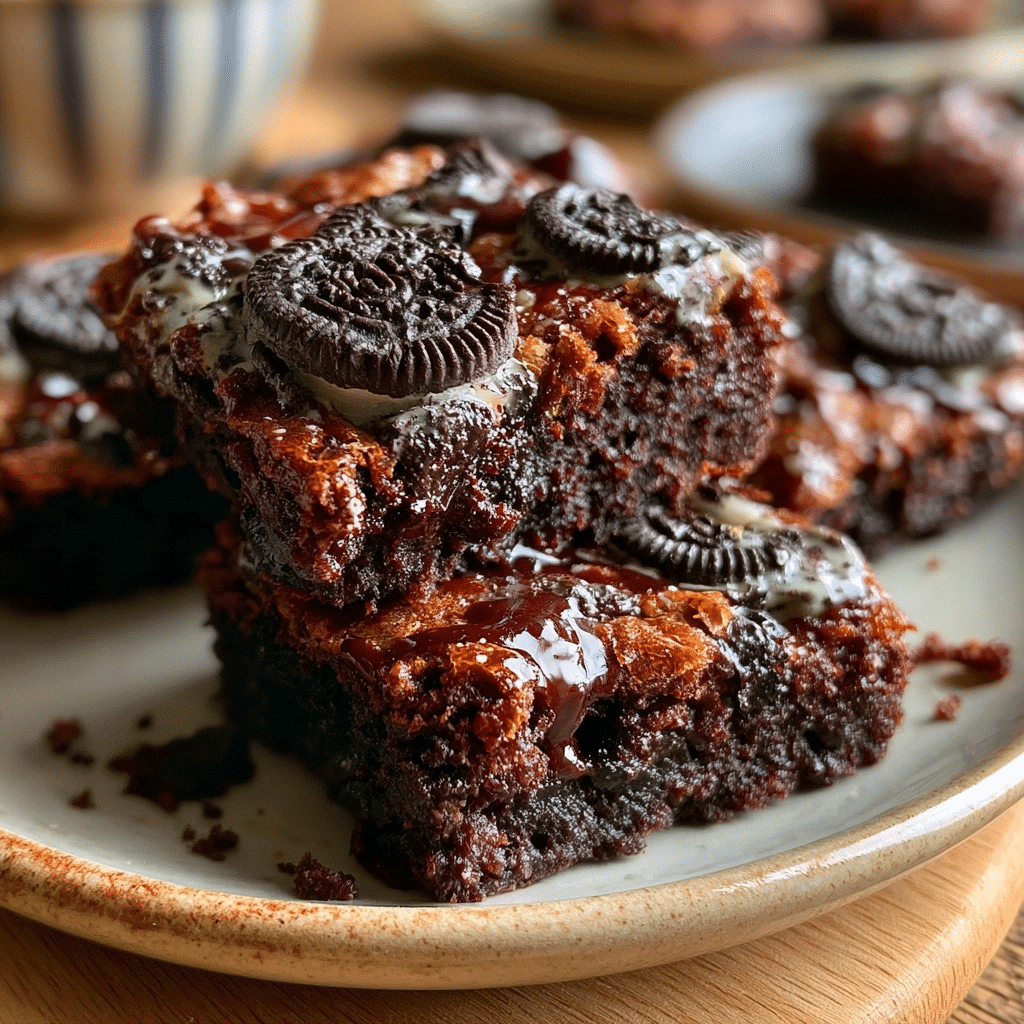
Oreo brownies represent the ultimate decadent fusion of chewy, fudgy chocolate squares and whole crunchy sandwich cookies. These popular dessert bars balance deep cocoa indulgence with the iconic sweetness of cream-filled biscuits for a balanced texture. You can create this professional-level treat in your home kitchen using simple baking staples and a single standard baking pan. Experience why this specific combination of dark cocoa and crunchy cookies creates a crowd-pleasing dessert that disappears within minutes of cooling.
| Prep Time | Cook Time | Total Time | Servings | Difficulty | Cuisine |
|---|---|---|---|---|---|
| 15 minutes | 30 minutes | 45 minutes | 16 | Easy | American |
Why This Recipe Works
This recipe achieves the perfect consistency by using a specific ratio of melted butter to oil, ensuring a fudgy center that stays moist for days. Many homemade brownie recipes turn cakey or dry, but our method relies on high-quality cocoa powder and the structural support provided by the intact cookies pressed into the batter.
I personally find that layering the Oreo cookies both inside and on top creates an experience of varying textures in every bite. When the hot oven heat hits the cookies, the centers soften slightly, creating a harmonious blend with the brownie crust. This is my go-to recipe for potlucks and bake sales because the inclusion of a brand-name component like Oreos guarantees a high success rate.
Ingredients
| Ingredient | Quantity | Notes |
|---|---|---|
| Unsalted Butter | 1 cup | Melted and slightly cooled |
| Granulated Sugar | 2 cups | Can substitute with brown sugar for chewiness |
| Large Eggs | 4 units | Room temperature is essential |
| Cocoa Powder | 1 cup | Use Dutch-processed for deeper color |
| All-Purpose Flour | 1 cup | Sift to avoid lumps |
| Oreo Cookies | 20 units | Standard size or Double Stuf |
| Salt | 0.5 tsp | Balances sweetness |
Step-by-Step Instructions
Preparation and Mixing
- Preheat your oven to 350°F (175°C) and line a 9×9 inch square pan with parchment paper.
- Melt the butter in a large microwave-safe bowl and whisk in the sugar until smooth.
- Add the eggs one at a time, whisking thoroughly to ensure a glossy batter.
- Fold in the sifted cocoa powder, flour, and salt just until the dry streaks disappear.
Assembly and Baking
- Pour half of the brownie batter into the prepared pan and spread evenly to the corners.
- Arrange 12-16 Oreo cookies in a single layer over the bottom batter layer.
- Cover with the remaining brownie batter and place the final cookies on top for a beautiful presentation.
- Bake for 30-35 minutes until a toothpick inserted into the brownie section comes out with just a few moist crumbs.
Chef Tips for Perfect Results
- Always use room temperature eggs to prevent the melted butter from hardening prematurely.
- Press your top cookies lightly into the batter before baking to ensure they adhere to the brownie as it rises.
- Allow the brownies to cool completely in the pan for at least two hours for cleaner, professional-looking slices.
- Use a plastic knife or a warm metal blade to slice through the Oreo layers without shattering the crust.
Common Mistakes to Avoid
- Overbaking: Leaving the brownies in the oven too long results in a dry, cake-like texture; pull them when the center still looks slightly soft.
- Skipping the Cooling: Cutting warm brownies causes the soft center to collapse and smear, ruining the visual appeal.
- Cold Ingredients: Using cold eggs forces the fats to separate, leading to a gritty rather than velvety texture.
Variations and Substitutions
| Ingredient | Substitution | Impact on Flavor |
|---|---|---|
| Oreo Cookies | Mint sandwich cookies | Adds a refreshing chocolate-mint profile |
| Unsalted Butter | Coconut oil | Introduces a subtle nutty aroma |
| Granulated Sugar | Coconut sugar | Provides a deeper, molasses-like undertone |
Serving Suggestions and Pairings
Serve these warm with a scoop of premium vanilla bean ice cream to create a classic brownie sundae experience. They pair exceptionally well with cold glasses of whole milk or unsweetened almond milk to contrast the intense chocolate sweetness. For elegant gatherings, dust the tops with powdered sugar after they have completely cooled.
Storage and Reheating
| Method | Duration | Instructions |
|---|---|---|
| Countertop | 3 days | Store in an airtight container at room temperature. |
| Refrigerator | 7 days | Keeps the brownies firm and chewy. |
| Freeze | 3 months | Wrap individually in plastic wrap and store in a freezer bag. |
Nutritional Information (Approximate values)
| Nutrient | Amount |
|---|---|
| Calories | 280 kcal |
| Fat | 14g |
| Protein | 3g |
| Carbohydrates | 38g |
Frequently Asked Questions
Can I use double-stuffed Oreos?
You can absolutely use double-stuffed Oreos to increase the creaminess of the inner layers. Note that the extra cream may cause the cookies to settle deeper into the batter during the bake.
How do I know when Oreo brownies are done?
Oreo brownies are finished baking when the edges appear set and a toothpick inserted into the center comes out with a few damp, chocolatey crumbs. Avoid a clean toothpick, which indicates an overbaked, dry brownie.
What is the best way to cut clean squares?
The best way to cut clean squares is to chill the brownies in the refrigerator for at least one hour before slicing. Use a large, sharp knife, wiping the blade clean after every single cut.
Can these be made a day in advance?
You should definitely make them a day in advance because the flavors mellow and the texture firms up significantly overnight. They are actually easier to handle and cut when they have aged for 24 hours.
How can I substitute gluten-free flour?
You can substitute the regular flour with a high-quality 1-to-1 gluten-free baking blend for similar results. Ensure the blend contains xanthan gum to provide the necessary structure for the heavy cookie layer.
Conclusion
Mastering the perfect batch of Oreo brownies is an achievable goal for any home baker with these precise steps. By focusing on ingredient temperature and respecting the cooling process, you guarantee a dessert that stays moist and delicious for days. Enjoy the combination of velvety chocolate and crunchy cookie in every decadent square. Share these with friends, or keep them to yourself for the ultimate chocolate fix; your new favorite treat is ready for the oven.
PrintOreo Brownies: Rich Chocolate Treats with Cookie Crunch
These decadent Oreo brownies are the ultimate fusion of chewy, fudgy chocolate squares and whole crunchy sandwich cookies. By layering the cookies both inside and on top, this recipe achieves a perfect balance of textures in every bite. Using high-quality cocoa powder and a specific butter-to-sugar ratio, these bars stay moist and rich for days, making them a reliable and crowd-pleasing dessert choice for any occasion.
- Prep Time: 15
- Cook Time: 30
- Total Time: 45
- Yield: 16 servings
- Category: recipe index
- Method: Baking
- Cuisine: American
- Diet: Vegetarian
Ingredients
1 cup unsalted butter, melted and slightly cooled
2 cups granulated sugar
4 large eggs, room temperature
1 cup cocoa powder, preferably Dutch-processed
1 cup all-purpose flour, sifted
20 Oreo cookies
0.5 tsp salt
Instructions
Preheat your oven to 350°F (175°C) and line a 9×9 inch square pan with parchment paper.
Melt the butter in a large microwave-safe bowl and whisk in the sugar until smooth.
Add the eggs one at a time, whisking thoroughly to ensure a glossy batter.
Fold in the sifted cocoa powder, flour, and salt just until the dry streaks disappear.
Pour half of the brownie batter into the prepared pan and spread evenly to the corners.
Arrange 12-16 Oreo cookies in a single layer over the bottom batter layer.
Cover with the remaining brownie batter and place the remaining cookies on top.
Bake for 30 minutes, or until the center is set but still fudgy.
Notes
You can substitute granulated sugar with brown sugar for a chewier texture. Ensure eggs are at room temperature for the best emulsion. Store in an airtight container at room temperature for up to 3 days.