Short, Catchy Intro
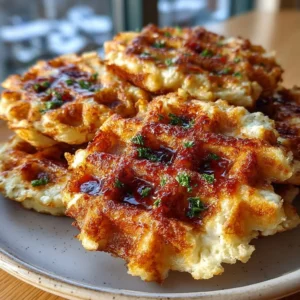
So you want something crispy, cheesy, and wildly snackable… but without dragging out flour, breadcrumbs, and half your kitchen? Yeah, same. This Cottage Cheese Onion Ring Melt Stack is the kind of recipe that makes people do a double take because it looks like something you’d order at a greasy comfort-food spot, except nope — it’s made with cottage cheese and onion rings, and somehow still delivers that gorgeous crispy edge and melty center.
It’s weird in the best way. It’s easy enough for a lazy Tuesday, impressive enough for a weekend snack board, and satisfying enough to make you forget you ever cared about traditional onion rings. Dramatic? Maybe. Wrong? Absolutely not.
Why This Recipe is Awesome
First of all, it’s crispy, cheesy, and packed with flavor. That alone should be enough, but let’s keep going because this recipe deserves its little moment. You get the sweet bite of onion, the salty golden edge from baked cottage cheese, and a melty, almost indulgent texture in the middle. It’s basically comfort food wearing a clever disguise.
Second, there’s no flour involved. No dredging stations. No messy bowls of mystery paste. No frying oil popping at your face like it has personal issues. You mix, stack, bake, and eat. That’s the kind of low-drama cooking we like around here.
It’s also pretty flexible. Want it as a snack? Done. Need a fun appetizer? Easy. Want to stand at the kitchen counter and eat the whole tray while pretending you’re “just tasting”? Honestly, I support that too.
And maybe my favorite part? It feels kind of ridiculous when you first make it, like, “There’s no way this should work.” Then it comes out of the oven with those golden crispy edges and gooey layers, and suddenly you’re acting like you invented modern cuisine. As you should.
Ingredients You’ll Need
- 1 1/2 cups cottage cheese – Full-fat works best for flavor and texture. Low-fat can work, but IMO it’s a little less exciting.
- 1 large onion – Slice into thick rings. Not paper-thin. We want structure, not onion shoelaces.
- 1 cup shredded mozzarella cheese – For the melt factor. The stretchy drama matters.
- 1/4 cup grated Parmesan cheese – Adds salty flavor and helps those crispy edges happen.
- 1 large egg – Helps hold everything together like the responsible adult in the room.
- 1/2 teaspoon garlic powder – Tiny ingredient, big attitude.
- 1/2 teaspoon onion powder – Yes, more onion. We are committing to the theme.
- 1/2 teaspoon smoked paprika – Optional, but highly recommended for a little smoky depth.
- Salt and black pepper – Add to taste. Don’t go wild at first; Parmesan already brings salt.
- Fresh chopped parsley – Optional for garnish, if you want to look fancy for no reason.
Step-by-Step Instructions
- Preheat your oven to 400°F (200°C). Line a baking sheet or small tray with parchment paper. Do not skip the parchment unless you enjoy scraping melted cheese off metal and questioning your life choices.
- Prep the onion rings. Peel the onion and slice it into thick rounds. Separate the slices into rings, keeping the larger ones for stacking. You want rings sturdy enough to hold the filling, not floppy little onion bracelets.
- Mix the cheesy base. In a bowl, combine the cottage cheese, mozzarella, Parmesan, egg, garlic powder, onion powder, smoked paprika, and a little black pepper. Stir until everything looks evenly mixed and slightly thick. If it seems too watery, let it sit for a minute.
- Build the stacks. Place a large onion ring on the prepared tray. Spoon a little of the cottage cheese mixture into the center and around the ring. Add another onion ring on top and repeat to create a layered “melt stack.” Think mini cheesy towers, not chaotic piles.
- Shape and tidy. Smooth a little extra cheese mixture around the edges so each stack holds together. Don’t make them too thick, though. A moderate stack bakes better and gets crispier edges. Greedy stacking leads to floppy sadness.
- Bake until golden. Slide the tray into the oven and bake for about 22 to 28 minutes. You’re looking for browned edges, bubbling cheese, and onions that have softened but still hold shape. If the tops need more color, broil for 1 to 2 minutes at the end.
- Cool slightly, then serve. Let the stacks rest for 5 minutes before moving them. This helps them firm up so they don’t collapse the second you touch them. Top with parsley if you’re feeling extra, then serve warm.
Common Mistakes to Avoid
Not preheating the oven. Rookie move. If the oven isn’t hot enough, the cheese melts before it crisps, and suddenly your “stack” looks more like a cheesy onion puddle.
Slicing the onions too thin. Thin rings fall apart fast and don’t give you that satisfying layered bite. Go thicker than you think you need.
Using watery cottage cheese without checking it. Some brands are looser than others. If yours looks extra wet, drain it lightly first. Otherwise, you’re baking steam, not crisp edges.
Making the stacks too tall. I get it. More sounds better. But unless you want the center undercooked and the outside overdone, keep the stacks reasonable.
Trying to move them too early. They need a few minutes to settle. Touch them fresh from the oven and they’ll fall apart faster than your weekend plans.
Alternatives & Substitutions
No mozzarella? Use shredded Monterey Jack or a pizza cheese blend. Anything that melts nicely will do the job. Cheddar works too, but it brings a stronger flavor and can get oilier.
Want more heat? Add chili flakes, diced jalapeños, or a pinch of cayenne to the cheese mixture. This recipe handles spice really well, especially if you like a little drama in your food.
Need extra protein? Toss in some chopped turkey bacon or shredded cooked chicken. Just don’t overload the filling or the stacks can lose shape.
Not into Parmesan? Pecorino works, and it’s a little saltier. Use a bit less unless you enjoy drinking water all afternoon.
Want a stronger onion flavor? Try sweet onions for a mellow bite or red onions for a sharper twist. Personally, I like sweet onions here because they soften beautifully and don’t bully the cheese.
PrintCottage Cheese Onion Ring Melt Stack — Zero-Flour Crisp Edge

Crispy, cheesy, and wildly snackable, this Cottage Cheese Onion Ring Melt Stack delivers golden edges, melty centers, and big comfort-food flavor without any flour. It’s an easy baked recipe that works as a fun appetizer, snack, or side dish.
- Prep Time: 15 minutes
- Cook Time: 25 minutes
- Total Time: 40 minutes
- Yield: 4 servings
- Category: Appetizer
- Method: Baked
- Cuisine: American
- Diet: Vegetarian
Ingredients
1 1/2 cups cottage cheese
1 large onion, sliced into thick rings
1 cup shredded mozzarella cheese
1/4 cup grated Parmesan cheese
1 large egg
1/2 teaspoon garlic powder
1/2 teaspoon onion powder
1/2 teaspoon smoked paprika (optional)
Salt, to taste
Black pepper, to taste
Fresh chopped parsley, optional for garnish
Instructions
1. Preheat your oven to 400°F (200°C) and line a baking sheet or tray with parchment paper.
2. Peel the onion and slice it into thick rounds, then separate the slices into rings.
3. In a bowl, mix the cottage cheese, mozzarella, Parmesan, egg, garlic powder, onion powder, smoked paprika, and black pepper until well combined.
4. Place one large onion ring on the prepared tray and spoon some of the cheese mixture into the center and around the ring.
5. Add another onion ring on top and repeat to build stacked layers.
6. Smooth a little extra mixture around the edges so the stacks hold together, but do not make them too thick.
7. Bake for 22 to 28 minutes, until the edges are golden and the cheese is bubbling.
8. Broil for 1 to 2 minutes at the end if you want extra color on top.
9. Let the stacks cool for 5 minutes before moving them, then garnish with parsley and serve warm.
Notes
Use full-fat cottage cheese for the best flavor and texture.
If your cottage cheese is watery, drain it lightly before mixing.
Slice the onion thick enough to hold its shape during baking.
Do not move the stacks right out of the oven or they may fall apart.
Serve with marinara, ranch, spicy mayo, or a garlicky yogurt sauce.
FAQ (Frequently Asked Questions)
Can I make these ahead of time?
Yes, but they’re best fresh. You can prep the cheese mixture and slice the onions ahead, then assemble and bake when ready. Reheated leftovers still taste good, though the edges won’t be quite as crisp.
Can I use low-fat cottage cheese?
Technically yes. Will it still work? Probably. Will it be as rich and delicious? Not quite. Full-fat gives the best texture and flavor, and this is not the time to chase disappointment.
Do I have to blend the cottage cheese first?
Nope. You can leave it as is for a more textured filling. If you want a smoother, almost creamy melt situation, blend it first. Both versions work, so pick your vibe.
Can I air fry them?
You can try, especially if your air fryer basket fits them comfortably. Just make sure they’re on parchment or a liner and don’t overcrowd them. They’ll cook faster, so keep an eye on them.
Are these actually crispy?
Yes — but the crispy part is mostly around the edges, where the cheese browns up beautifully. The center stays melty and soft. So no, they’re not crunchy like battered deep-fried onion rings. They’re more interesting than that, FYI.
What should I serve with them?
A dip is never a bad idea. Marinara, spicy mayo, ranch, or even a garlicky yogurt sauce all work. Or serve them next to grilled meat, a salad, or eggs and call it a real meal.
Can I freeze them?
You can, but I wouldn’t call it their best life. The texture changes a bit after thawing. If you do freeze them, reheat in the oven or air fryer so the edges come back to life.
Final Thoughts
This Cottage Cheese Onion Ring Melt Stack is proof that weird-sounding recipes are sometimes the ones worth making first. It’s crispy, cheesy, simple, and just different enough to feel fun without becoming one of those “look what I made” experiments nobody actually wants to eat.
Whether you serve it as a snack, side dish, or late-night kitchen reward, it absolutely brings the kind of comfort-food energy people love. Plus, it makes you look creative with very little effort, which is honestly the dream.
So go make a tray, let those edges get golden, and enjoy every melty bite. Now go impress someone — or just impress yourself — with your new culinary skills. You’ve earned it.