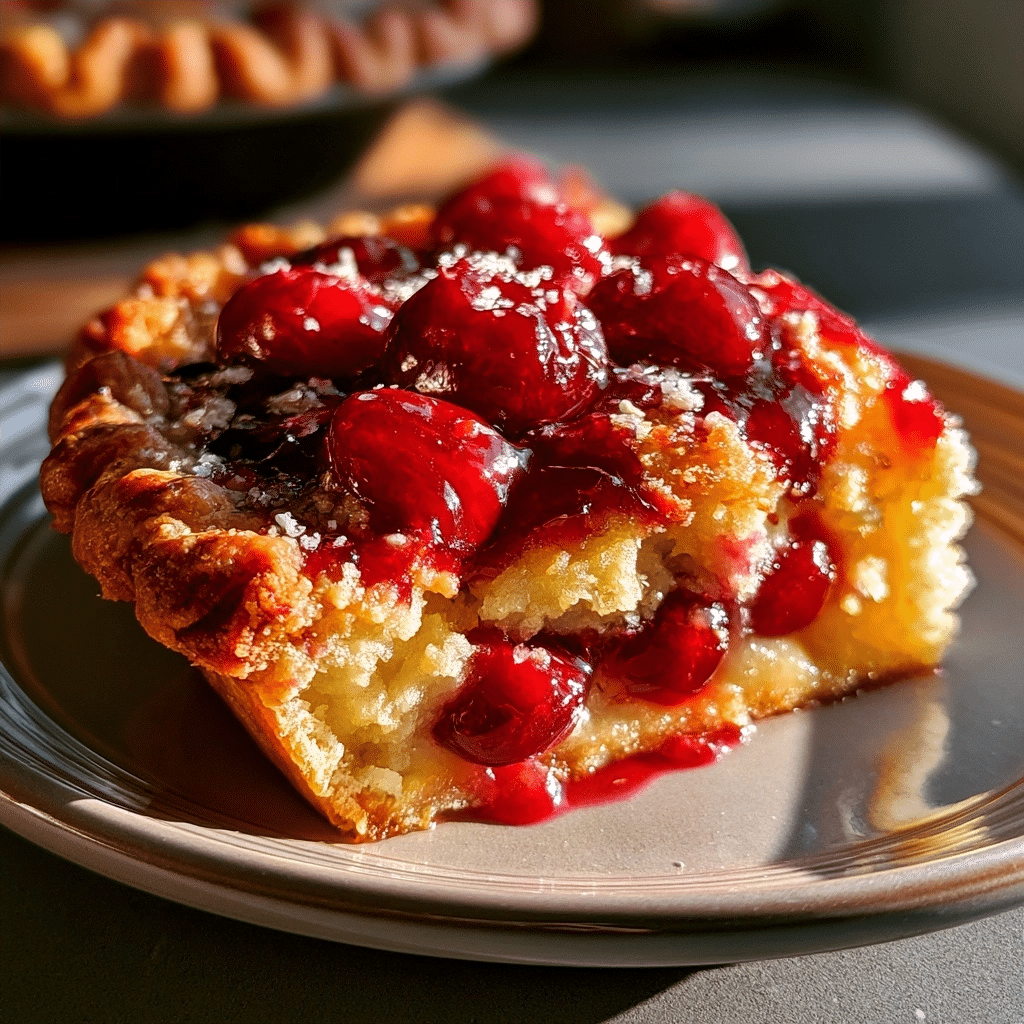
A classic Cherry Pie is the ultimate dessert: a flaky, buttery crust encasing a vibrant, sweet-tart cherry filling. This recipe delivers a thick, never-runny filling and a beautifully golden lattice top every time. The balance of sweet cherries and a touch of lemon creates a perfect slice of Americana.
Recipe Overview
| Prep Time | 1 hour 30 minutes |
|---|---|
| Cook Time | 1 hour |
| Total Time | 2 hours 30 minutes (plus cooling) |
| Servings | 8 |
| Difficulty | Intermediate |
| Cuisine | American |
Why This Recipe Works
This Cherry Pie recipe has been my go-to for years because the filling stays perfectly thick without any cornstarch aftertaste. I use a combination of fresh or frozen cherries and let them macerate with sugar and cornstarch before baking. That step draws out just enough juice to create a syrupy, clear filling that sets beautifully.
The crust is a classic butter pastry that I chill thoroughly. Using a food processor for the butter cuts down on hand temperature issues, but the key is handling the dough as little as possible. The result is a tender, flaky crust that doesn’t shrink. I also bake the pie on a lower oven rack with a baking sheet underneath to catch any drips and ensure the bottom crust crisps perfectly.
This recipe works for both sweet and sour cherries. If you use sweet cherries, reduce the sugar slightly and add a tablespoon of lemon juice for brightness. The lattice top is not only beautiful but also allows steam to escape, preventing a soggy interior.
Ingredients
| Ingredient | Quantity | Notes with alternatives |
|---|---|---|
| All-purpose flour | 2 1/2 cups | For crust; substitute 1:1 gluten-free blend if needed |
| Salt | 1 tsp | Fine sea salt |
| Granulated sugar | 1 tsp (crust) + 3/4 cup (filling) | Use organic sugar or coconut sugar for filling variation |
| Unsalted butter | 1 cup (2 sticks) for crust + 2 tbsp for filling | Cold butter is essential; vegan butter works |
| Ice water | 6-8 tbsp | Add one tablespoon at a time |
| Cherries (fresh or frozen) | 6 cups pitted | Sweet or tart; if frozen, do not thaw |
| Cornstarch | 1/4 cup | Or use tapioca starch |
| Lemon juice | 1 tbsp | Freshly squeezed; keeps cherries bright |
| Vanilla extract | 1 tsp | Pure vanilla; no imitation |
| Almond extract | 1/4 tsp | Optional, but enhances cherry flavor |
| Egg yolk | 1 | For egg wash; can use milk only |
| Milk | 2 tbsp | Whole milk or cream |
Step-by-Step Instructions
Phase 1: Make the Pie Crust
- Combine flour, salt, and 1 teaspoon sugar in a large mixing bowl or food processor. Pulse briefly to mix.
- Add cold butter cubes. Use a pastry blender or pulse until the mixture resembles coarse meal with some pea-sized butter pieces.
- Drizzle ice water over the mixture, 1 tablespoon at a time, and mix gently with a fork or pulse until the dough just holds together when pressed.
- Divide dough into two equal discs, flatten into 1-inch thick rounds, wrap in plastic wrap, and refrigerate for at least 1 hour (or up to 2 days).
- While dough chills, prepare the filling.
Phase 2: Prepare the Cherry Filling
- Place pitted cherries in a large bowl. Add sugar, cornstarch, lemon juice, vanilla, and almond extract. Toss gently to coat.
- Let the mixture sit at room temperature for 15 minutes to allow juices to release and cornstarch to dissolve.
- Do not drain the juices; they will thicken during baking.
Phase 3: Roll and Assemble
- Preheat oven to 400°F (200°C). Place a baking sheet on the lower rack to catch drips.
- Remove one dough disc from fridge. On a lightly floured surface, roll it into a 12-inch circle, about 1/8-inch thick.
- Transfer the rolled dough to a 9-inch pie dish, gently pressing into the bottom and sides without stretching. Trim overhang to about 1/2 inch.
- Pour the cherry filling into the crust. Dot the filling with the remaining 2 tablespoons butter pieces.
- Roll out the second dough disc to 12 inches. Using a pastry wheel or knife, cut into 10-12 strips (about 1 inch wide).
- Create a lattice top: place half the strips vertically, then fold back every other strip to weave horizontal strips. Repeat until lattice is complete.
- Trim lattice strips to match the pie dish edge. Fold the bottom crust over the lattice edges, crimping decoratively.
- In a small bowl, whisk egg yolk and milk. Brush the entire crust surface with egg wash.
Phase 4: Bake to Perfection
- Place the pie on the lower oven rack (on the preheated baking sheet). Bake at 400°F for 20 minutes.
- Reduce oven temperature to 375°F (190°C) and continue baking for 40-50 minutes, or until the crust is deep golden brown and the filling is bubbling in the center.
- If the crust browns too quickly, tent loosely with aluminum foil after 30 minutes.
- Cool the pie completely on a wire rack for at least 4 hours (overnight is best) to allow the filling to set before slicing.
Chef Tips for Perfect Results
- Keep everything cold: For a flaky crust, work with chilled butter and ice water. If the dough becomes warm, refrigerate it for 10 minutes before rolling.
- Use a combination of sweet and tart cherries: Blending 3 cups each gives the best flavor. If using all sweet cherries, increase lemon juice to 2 tablespoons.
- Don’t skip the maceration: Letting the cherries sit with sugar and cornstarch for 15 minutes ensures the filling thickens evenly without being runny.
- Egg wash for shine: Brush the crust with egg wash right before baking. For extra sparkle, sprinkle with coarse sugar immediately after brushing.
- Use a baking sheet: Always place a baking sheet on the rack below to catch any bubbling juices; this prevents oven mess and ensures even heat distribution.
- Cool completely: Cutting a warm pie will cause the filling to flow out. Patience yields perfect, clean slices.
Common Mistakes to Avoid
- Soggy bottom crust: This happens when the filling is too wet or the oven isn’t hot enough. Solution: Preheat the oven fully and use the lower rack. Blind-baking is not needed for this recipe because the bottom crust bakes on a hot sheet pan.
- Runny filling: Under-cornstarching or cutting the pie too early. Solution: Use exactly 1/4 cup cornstarch, and let the pie cool for at least 4 hours before slicing. If using frozen cherries, do not thaw them.
- Burnt edges: The crust may darken faster than the filling cooks. Solution: Tent the edges with foil or a pie shield after 30 minutes of baking.
- Tough crust: Overworking the dough or using warm hands develops gluten. Solution: Mix until just combined, and rest the dough in the fridge. Roll gently.
- Filling overflowing: Overfilling the crust or not leaving enough headspace. Solution: Fill the crust only to the rim (about 6 cups) and use a lattice top to allow steam to escape.
Variations and Substitutions
| Ingredient | Substitution | Impact on Flavor |
|---|---|---|
| All-purpose flour (crust) | Gluten-free 1:1 blend | More crumbly texture; may need a touch more water |
| Butter (crust) | Vegan butter or shortening (half) | Less rich flavor; shortening yields more flakiness but less taste |
| Granulated sugar (filling) | Coconut sugar or maple syrup (reduce liquid) | Deeper, caramel-like sweetness; adjust cornstarch if using syrup |
| Cornstarch | Tapioca starch or arrowroot powder | Use same amount; slightly different gel consistency |
| Vanilla extract | Vanilla bean paste or seeds | More intense vanilla flavor; use 1/2 the seeds of a pod |
| Almond extract | Omit or use 1/2 tsp vanilla | Less aromatic; cherry flavor stands alone |
| Fresh cherries | Frozen (no thaw) or drained canned | Frozen works perfectly; canned need extra cornstarch (reduce sugar) |
Serving Suggestions and Pairings
This Classic Cherry Pie is ideal for summer picnics, Fourth of July celebrations, or a cozy Thanksgiving dessert. Serve each slice with a generous scoop of vanilla bean ice cream or a dollop of lightly sweetened whipped cream. For a sophisticated twist, pair with a small glass of chilled apple cider (non-alcoholic) or a warm chamomile tea. The pie also shines as a brunch centerpiece when served alongside fresh berries and a fruit salad. For a special occasion, garnish with mint leaves and a dusting of powdered sugar.
Storage and Reheating
| Method | Duration | Instructions |
|---|---|---|
| Countertop (covered) | Up to 2 days | Store at room temperature under a pie dome or loosely wrapped with foil. Do not refrigerate as it dries the crust. |
| Refrigerator | Up to 5 days | If you must refrigerate, cover tightly. Let come to room temperature before serving. |
| Freezer (unbaked pie) | Up to 3 months | Assemble pie fully (do not brush with egg wash), wrap in plastic and foil. Bake from frozen, adding 15-20 minutes to bake time. |
| Freezer (baked pie) | Up to 3 months | Cool completely, wrap well, freeze. Reheat uncovered at 350°F for 15-20 minutes. |
| Reheating single slices | 10 seconds | Microwave on high for 10-15 seconds to warm the filling, then crisp crust in a toaster oven at 350°F for 5 minutes. |
Nutritional Information
Approximate values per serving (1 slice, assuming 8 servings).
| Nutrient | Amount per Serving |
|---|---|
| Calories | 420 kcal |
| Total Fat | 22 g |
| Saturated Fat | 12 g |
| Cholesterol | 80 mg |
| Sodium | 300 mg |
| Total Carbohydrates | 54 g |
| Dietary Fiber | 3 g |
| Sugars | 28 g |
| Protein | 5 g |
Frequently Asked Questions
Can I use frozen cherries without thawing?
Yes, use frozen cherries directly from the bag without thawing. Increase cornstarch by 1 tablespoon to compensate for extra moisture, and expect a slightly longer baking time (add 10-15 minutes). The filling will still thicken perfectly.
How do I know when my cherry pie is fully baked?
Look for a deep golden brown crust and thick, bubbly filling visible through the lattice vents. The internal temperature should reach at least 185°F (85°C). If the center is still liquid, return to oven for 10 more minutes. The pie will set further as it cools.
Why did my pie crust shrink during baking?
Crust shrinkage usually occurs because the dough was overworked or not rested enough. Ensure the dough chills for at least 1 hour after rolling before baking. Also, avoid stretching the dough when placing it in the pie dish; gently press it into the corners.
Can I make this cherry pie ahead of time?
Absolutely. Bake the pie completely, cool, and store at room temperature for up to 2 days. Alternatively, freeze the unbaked pie (without egg wash) for up to 3 months. Bake from frozen, adding 15-20 minutes to the total time. Brush with egg wash right before baking.
What’s the best way to serve cherry pie at a party?
Slice the pie while still slightly warm (after at least 4 hours of cooling) and serve with vanilla ice cream or whipped cream. For a buffet, pre-slice and place on a platter with garnishes. Pair with a hot coffee bar or cold apple cider for a crowd-pleasing dessert.
Conclusion
This Classic Cherry Pie delivers a buttery, flaky crust and a luscious, perfectly thickened cherry filling with every bite. Whether you use fresh summer cherries or frozen ones, the recipe is reliable and adaptable. The sweet-tart balance and beautiful lattice top make it a showstopper for any occasion. Bake this pie and taste why it’s a timeless favorite—its signature flavor will have everyone asking for seconds.
PrintClassic Cherry Pie Recipe

A flaky, buttery crust cradles a vibrant sweet-tart cherry filling with a golden lattice top. Perfectly thick without cornstarch aftertaste, featuring a balance of sweet and tangy flavors.
- Prep Time: 90
- Cook Time: 60
- Total Time: 150
- Yield: 8 servings
- Category: recipe index
- Method: Baking
- Cuisine: American
- Diet: Vegetarian
Ingredients
2 1/2 cups all-purpose flour
1 tsp salt (fine sea salt)
1 tsp granulated sugar (crust) + 3/4 cup granulated sugar (filling)
1 cup unsalted butter (cold, for crust) + 2 tbsp unsalted butter (for filling)
6-8 tbsp ice water
6 cups pitted cherries (fresh or frozen)
1/4 cup cornstarch (or tapioca starch)
1 tbsp lemon juice (freshly squeezed)
1 tsp vanilla extract (pure)
1/4 tsp almond extract (optional)
1 egg yolk (for egg wash) + 2 tbsp milk
Instructions
In a food processor, combine 2 1/2 cups flour, 1 tsp salt, and 1 tsp sugar. Add 1 cup cold butter and pulse until crumbs form.
Gradually add ice water (1 tbsp at a time) until dough clumps. Divide dough, shape into discs, wrap in plastic, and chill for 1 hour.
In a bowl, mix cherries with 3/4 cup sugar, cornstarch, 1 tbsp lemon juice, 1 tsp vanilla, and 1/4 tsp almond extract. Let macerate for 15 minutes.
Roll out one dough disc on a floured surface to 12-inch diameter. Transfer to 9-inch pie dish, trimming edges. Add cherry filling, mounding slightly.
Roll out second dough disc into strips for lattice top. Arrange over filling, crimp edges, and chill for 30 minutes.
Whisk egg yolk with 2 tbsp milk. Brush onto pie surface. Bake at 375°F on lower oven rack with baking sheet below for 45-55 minutes, until golden and bubbling.
Notes
Use vegan butter if preferred. For gluten-free crust, substitute 1:1 gluten-free flour blend.
Sweet cherries need less sugar; reduce to 1/2 cup and add 1 tbsp extra lemon juice.
Lattice top allows steam to escape, preventing sogginess. Let pie cool completely before serving.
Cherries can be frozen (unthawed) for thick filling.