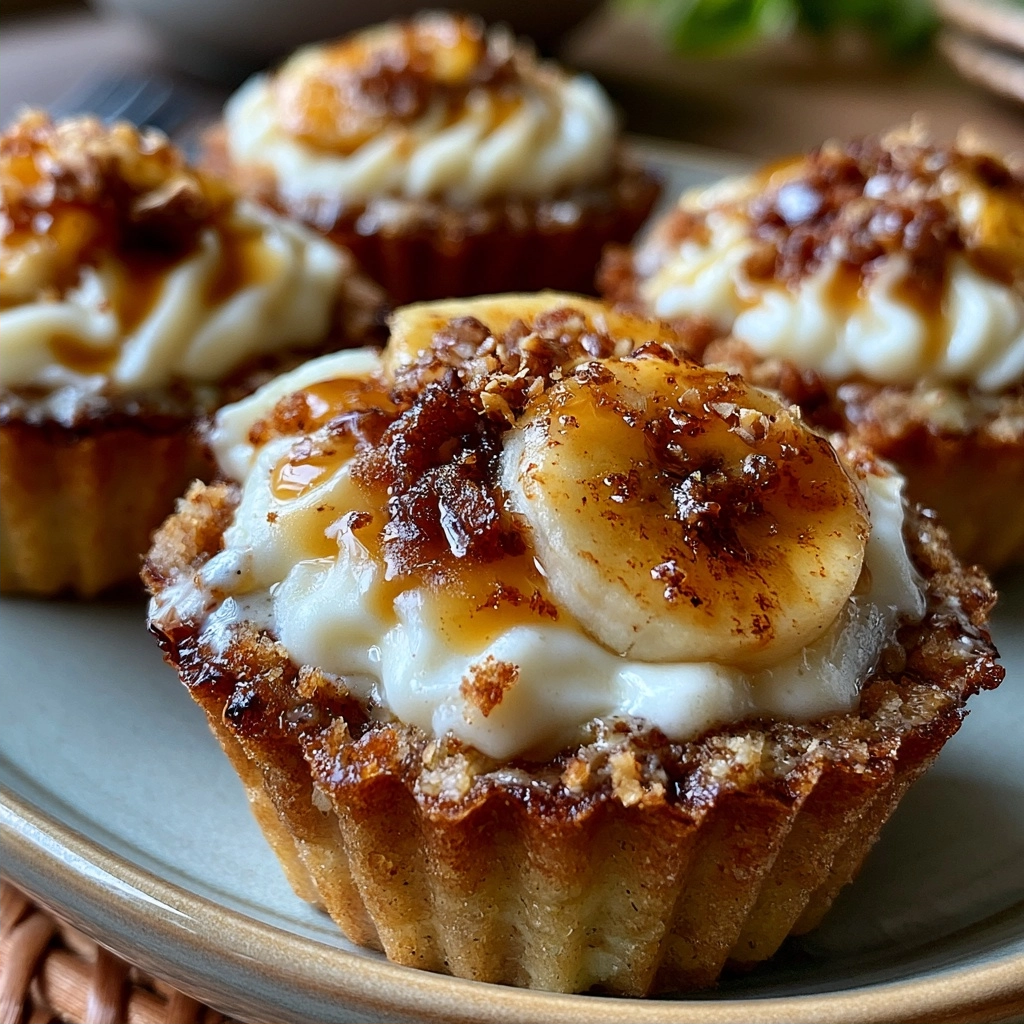
Banana pudding cups are individual layered desserts featuring creamy vanilla pudding, fresh bananas, and crunchy vanilla wafers. This no-bake recipe delivers the classic Southern comfort in a portable, personal serving. Perfect for parties, potlucks, or a quick weeknight treat.
Recipe Overview
| Prep Time | 20 minutes |
|---|---|
| Cook Time | 10 minutes |
| Total Time | 3 hours 30 minutes (includes chilling) |
| Servings | 8 cups |
| Difficulty | Easy |
| Cuisine | American |
Why This Recipe Works
I’ve tested countless banana pudding recipes, and this version consistently wins praise. The homemade pudding uses cornstarch and egg yolks for a silky, stable texture that holds its shape when layered. Unlike boxed mixes, this pudding has a clean vanilla flavor without artificial aftertaste.
Using individual cups means every serving has the perfect ratio of pudding, bananas, and wafers. No messy slicing at the table, and the cups chill faster than a large dish. The whipped cream folded into the pudding adds lightness while the topping stays cloud-like.
This recipe is also forgiving—you can swap in store-bought pudding in a pinch, but the homemade version elevates the dessert to bakery quality. The wafers soften slightly but keep a pleasant crunch, creating a satisfying contrast.
Ingredients
| Ingredient | Quantity | Notes & Substitutions |
|---|---|---|
| Whole milk | 2 cups | 2% works, but whole milk gives creamier pudding. |
| Granulated sugar | 1/2 cup | Reduce to 1/3 cup if you prefer less sweet. |
| Cornstarch | 3 tablespoons | Arrowroot powder works too (same amount). |
| Salt | 1/4 teaspoon | Enhances sweetness. |
| Egg yolks | 3 large | Room temperature for smooth mixing. |
| Vanilla extract | 2 teaspoons | Use pure vanilla, not imitation. |
| Unsalted butter | 1 tablespoon | Adds richness; omit for dairy-free. |
| Heavy cream | 2 cups | Substitute with 4 cups thawed whipped topping. |
| Powdered sugar | 1/4 cup | For whipping cream. |
| Vanilla wafers | 11 oz box | Any brand; gluten-free works. |
| Ripe bananas | 4 medium | Firm but yellow with some brown spots. |
Step-by-Step Instructions
Make the Pudding Base
- Whisk milk, sugar, cornstarch, salt, and egg yolks in a medium saucepan until smooth.
- Cook over medium heat, stirring constantly with a rubber spatula, until mixture thickens and bubbles appear (about 5 minutes).
- Remove from heat and stir in vanilla extract and butter until melted and glossy.
- Pour pudding through a fine-mesh sieve into a bowl to remove any lumps.
- Cover surface directly with plastic wrap to prevent skin from forming. Refrigerate for 1 hour until cool.
Prepare the Whipped Cream
- Chill a large bowl and beaters in the freezer for 10 minutes.
- Pour heavy cream and powdered sugar into the bowl. Beat on medium-high speed until stiff peaks form (about 3 minutes).
- Fold half of the whipped cream into the chilled pudding until fully combined. Reserve the other half for topping.
Layer the Cups
- Choose 8 clear cups (8 oz capacity) for visible layers.
- Place 3 vanilla wafers in the bottom of each cup.
- Add a layer of 2-3 banana slices (about 1/2 banana per cup).
- Spoon 2 tablespoons of the pudding mixture over the bananas.
- Repeat with another layer of wafers, bananas, and pudding.
- Top each cup with a generous dollop of reserved whipped cream.
- Crush a few wafers and sprinkle over the whipped cream for garnish.
- Refrigerate for at least 2 hours (or overnight) to allow wafers to soften slightly.
Chef Tips for Perfect Results
- Use ripe but firm bananas – Overripe bananas turn mushy and brown quickly. Choose bananas with yellow peel and a few brown spots, not fully brown.
- Stir pudding constantly – Cornstarch thickens fast; if you stop stirring, lumps form. Use a silicone spatula to scrape the bottom and corners of the pan.
- Chill pudding before folding – Hot pudding melts whipped cream. Cool it completely (about 1 hour) before folding.
- Layer immediately after slicing – Bananas oxidize and turn brown. Slice them right before assembling and press them gently into the pudding to minimize air contact.
- Don’t overmix whipped cream – Stop when stiff peaks form. Overbeaten cream turns buttery and grainy.
- Use glasses or jars – Clear cups showcase the beautiful layers and make serving easy. Ramekins also work.
Common Mistakes to Avoid
- Pudding becomes lumpy – Not whisking constantly or adding egg yolks to hot milk directly causes scrambling. Always whisk yolks with cold milk first, then heat slowly.
- Bananas turn brown – Slicing too early or leaving them exposed to air. Slice just before layering, and add a squeeze of lemon juice if you need extra time.
- Soggy wafers – Letting assembled cups sit too long at room temperature. Refrigerate immediately after assembly; the wafers will soften to a cake-like texture, not mush.
- Whipped cream deflates – Using warm cream or overmixing. Ensure cream is very cold (below 40°F) and stop beating as soon as peaks hold.
- Runny pudding – Not cooking the pudding long enough or using insufficient cornstarch. The mixture should visibly thicken and hold a line drawn on a spatula.
Variations and Substitutions
| Ingredient | Substitution | Impact on Flavor |
|---|---|---|
| Whole milk | Oat milk + 1 tbsp cornstarch extra | Slightly thinner, less rich. Still creamy. |
| Butter | Coconut oil (refined) | Subtle coconut note, dairy-free. |
| Vanilla wafers | Shortbread cookies or graham crackers | Butterier or sweeter crust-like texture. |
| Heavy cream | Full-fat coconut cream (chilled) | Coconut flavor, dairy-free, equally fluffy. |
| Sugar | Maple syrup (reduce to 1/3 cup) | Earthy sweetness, liquid may affect pudding set. |
Serving Suggestions and Pairings
Serve banana pudding cups chilled for dessert at summer barbecues, family reunions, or holiday gatherings. They pair beautifully with iced tea, lemonade, or a warm cup of coffee. For an extra indulgence, drizzle with caramel sauce or chocolate syrup just before serving. These cups also work as a fun make-ahead treat for kids’ birthday parties—skip the alcohol never needed anyway.
Storage and Reheating
| Method | Duration | Instructions |
|---|---|---|
| Refrigerator | Up to 3 days | Cover each cup with plastic wrap or lid. Wafers soften more over time. |
| Freezer | Up to 1 month | Place cups in freezer-safe containers. Thaw overnight in fridge. Whipped cream may lose some volume. |
| Reheating | Not recommended | Best served cold. If needed, microwave pudding cups for 10 seconds to soften chilled bananas, but texture changes. |
Nutritional Information
| Nutrient | Amount per Serving |
|---|---|
| Calories | 450 |
| Protein | 5g |
| Fat | 28g |
| Carbohydrates | 48g |
| Fiber | 2g |
| Sugar | 32g |
| Sodium | 280mg |
Approximate values. For lighter version, use low-fat milk and reduced-fat wafers.
Frequently Asked Questions
Can I use store-bought pudding mix instead of homemade?
Yes, instant vanilla pudding prepared with cold milk works as a quick substitute. The texture will be slightly less creamy, but the overall taste remains satisfying. Use two 3.4 oz boxes and follow package directions.
How do I prevent the bananas from browning?
Slice bananas immediately before assembling and dip them in lemon juice or pineapple juice. The acid slows oxidation. Also press the slices into the pudding so no air touches them.
Can I make banana pudding cups ahead of time?
Absolutely. Assemble the cups up to 24 hours in advance. The wafers will soften to a cake-like consistency, which many people prefer. Store covered in the refrigerator.
What if my pudding is too thick?
Whisk in 1-2 tablespoons of warm milk after cooking to loosen it. If it’s lumpy, pass it through a sieve again. Thick pudding is also fine for layering—it will hold the structure better.
Can I use a different type of cookie?
Yes, shortbread, graham crackers, or even chocolate wafers work well. Each changes the flavor profile: graham adds honey notes, chocolate adds richness. Crush them to similar size as vanilla wafers.
Conclusion
Banana pudding cups offer a delightful balance of creamy pudding, fresh banana, and crunchy wafer in every spoonful. This easy no-bake recipe is perfect for any busy cook who wants a dessert that looks impressive yet requires minimal effort. The individual servings ensure everyone gets their fair share of the classic Southern flavor. Make these cups for your next gathering and watch them disappear fast.
PrintBanana Pudding Cups

Layered dessert cups with homemade vanilla pudding, sliced bananas, and vanilla wafers. A no-bake portable dessert with a creamy, silky texture and satisfying crunch. Perfect for gatherings or quick treats.
- Prep Time: 20
- Cook Time: 10
- Total Time: 210
- Yield: 8 cups
- Method: Layering
- Cuisine: American
- Diet: Vegetarian
Ingredients
2 cups whole milk
1/2 cup granulated sugar
3 tablespoons cornstarch
1/4 teaspoon salt
3 large egg yolks (room temperature)
2 teaspoons vanilla extract
1 tablespoon unsalted butter
2 cups heavy cream
1/4 cup powdered sugar
11 oz box vanilla wafers
4 medium ripe bananas
Instructions
Whisk milk, sugar, cornstarch, salt, and egg yolks in a saucepan until smooth
Cook over medium heat, stirring constantly, until thickened
Remove from heat and stir in vanilla and butter
Chill pudding until thickened
Whip heavy cream with powdered sugar
Layer pudding, banana slices, and wafers in cups
Repeat layers and top with whipped cream
Chill for 2 hours before serving
Notes
Use 2% milk or dairy-free alternatives
Omit butter for vegan option
Swirl in caramel sauce if desired
Store covered in fridge up to 24 hours
Use room-temperature egg yolks for smoother pudding