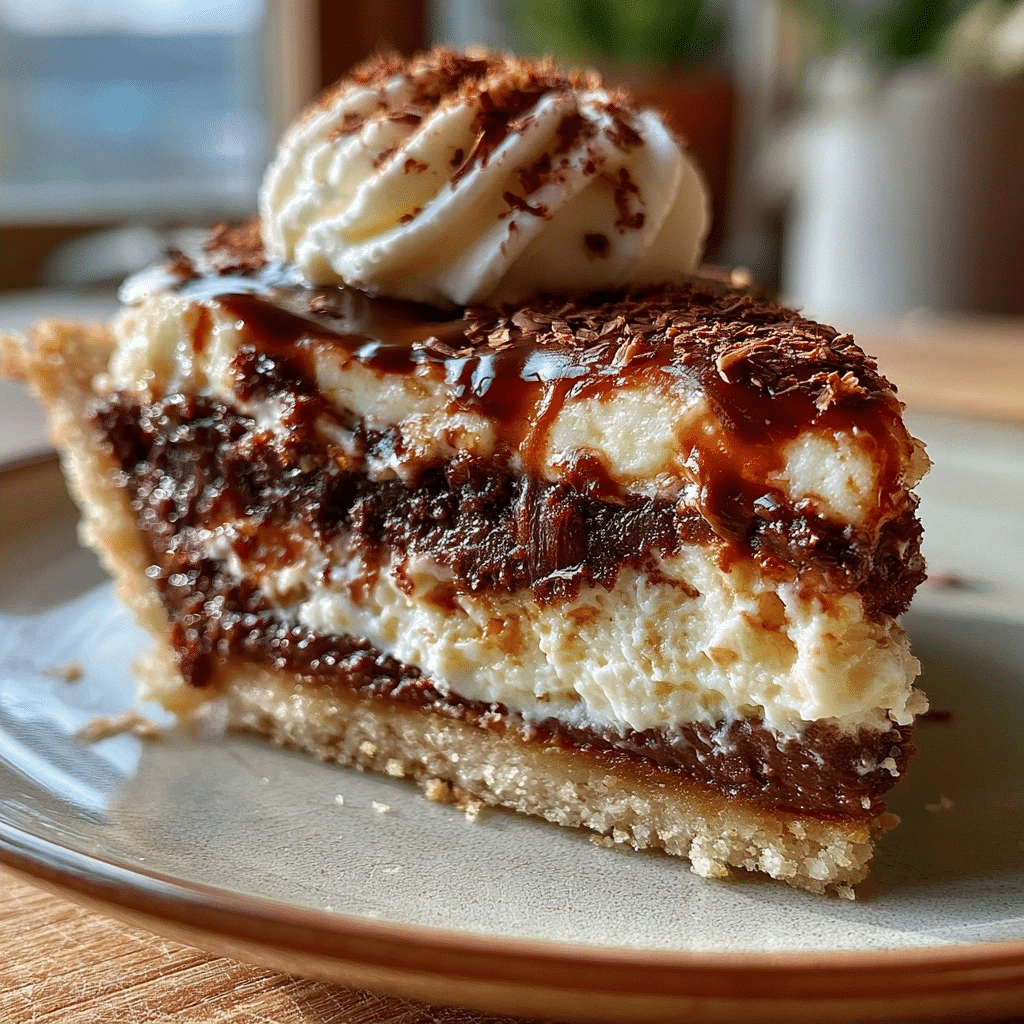
This ultimate chocolate cream pie recipe delivers a silky smooth, rich chocolate filling nestled in a crisp, buttery crust. It is the quintessential dessert for any chocolate lover. Experience pure bliss with every decadent spoonful of this classic treat.
Recipe Overview
| Prep Time | 25 minutes |
|---|---|
| Cook Time | 35 minutes |
| Total Time | 1 hour (plus chilling time) |
| Servings | 8 servings |
| Difficulty | Medium |
| Cuisine | American |
Why This Recipe Works
This recipe achieves its incredible texture and depth of flavor through careful ingredient selection and technique. The use of both cocoa powder and melted chocolate ensures a robust, double-layered chocolate experience. Cornstarch provides the perfect thickening agent, creating a luscious, velvety pudding that sets beautifully without being gummy. This balance ensures a professional-quality pie that’s surprisingly achievable at home.
Furthermore, the pre-baking of the pie crust, often called blind baking, is critical. It prevents a soggy bottom, guaranteeing a crisp counterpoint to the creamy filling. This step allows the crust to become fully cooked and golden before the filling is added, ensuring structural integrity and a delightful crunch. Each component plays a vital role in creating a harmonious dessert that satisfies every chocolate craving magnificently.
Ingredients
| Ingredient | Quantity | Notes |
|---|---|---|
| All-purpose flour | 1 1/4 cups | For the crust |
| Granulated sugar | 1/4 cup + 1/2 cup | 1/4 cup for crust, 1/2 cup for filling |
| Salt | 1/2 teaspoon + pinch | For crust and filling |
| Unsalted butter, cold and cubed | 1/2 cup (1 stick) | For the crust |
| Ice water | 4-6 tablespoons | For the crust |
| Unsweetened cocoa powder | 1/2 cup | Dutch-processed yields a darker color and smoother flavor |
| Cornstarch | 1/2 cup | For thickening the filling |
| Milk | 3 cups | Whole milk provides the richest texture |
| Large egg yolks | 4 | Add richness and color |
| Vanilla extract | 2 teaspoons | Pure vanilla extract is best |
| Semi-sweet chocolate, chopped | 4 ounces | Use good quality chocolate for best results |
| Heavy cream, cold | 1 1/2 cups | For whipped cream topping |
| Powdered sugar | 1/4 cup | For sweetening whipped cream |
| Chocolate shavings or curls | Optional | For garnish |
Step-by-Step Instructions
Prepare the Pie Crust
In a large bowl, whisk together the flour, 1/4 cup granulated sugar, and 1/2 teaspoon salt.
Cut in the cold butter using a pastry blender or your fingertips until the mixture resembles coarse crumbs with some pea-sized pieces of butter remaining.
Gradually add the ice water, one tablespoon at a time, mixing until the dough just comes together. Do not overmix.
Form the dough into a disc, wrap it tightly in plastic wrap, and refrigerate for at least 30 minutes.
Preheat your oven to 375°F (190°C). On a lightly floured surface, roll out the dough into a 12-inch circle.
Carefully transfer the dough to a 9-inch pie plate. Trim and crimp the edges decoratively.
Line the crust with parchment paper and fill with pie weights or dried beans. Bake for 15 minutes.
Remove the parchment paper and weights, then bake for another 10-15 minutes, or until golden brown. Let cool completely.
Make the Chocolate Filling
In a medium bowl, whisk together the cocoa powder, 1/2 cup granulated sugar, cornstarch, and pinch of salt. Set aside.
In a medium saucepan, whisk the egg yolks lightly. Gradually whisk in the milk until fully combined.
Add the cocoa-sugar mixture to the saucepan with the milk and egg yolks. Whisk until smooth and no lumps remain.
Cook over medium heat, whisking constantly, until the mixture thickens considerably and begins to bubble. This typically takes about 8-10 minutes. Ensure it comes to a gentle boil.
Remove the saucepan from the heat. Stir in the chopped semi-sweet chocolate and vanilla extract until the chocolate is completely melted and the mixture is smooth and glossy.
Pour the hot chocolate filling into the cooled, pre-baked pie crust. Smooth the top with a spatula.
Press plastic wrap directly onto the surface of the filling to prevent a skin from forming. Refrigerate for at least 4 hours, or until completely chilled and set.
Prepare the Whipped Cream Topping
In a cold bowl, using an electric mixer, beat the cold heavy cream on medium-high speed until soft peaks form.
Gradually add the powdered sugar and continue beating until stiff peaks form. Be careful not to overbeat.
Assemble and Serve
Once the pie is thoroughly chilled and set, remove the plastic wrap. Top generously with the prepared whipped cream.
Garnish with chocolate shavings or curls, if desired. Slice and serve immediately.
Chef Tips for Perfect Results
- Ensure all ingredients for the filling are at room temperature before combining, except the egg yolks, which should be whisked lightly.
- When blind baking the crust, prick the bottom with a fork before adding weights to prevent puffing.
- Cook the pudding filling over medium heat and whisk constantly to prevent scorching and ensure a smooth consistency.
- Chill the bowl and whisk attachment for the whipped cream for at least 15 minutes to help the cream whip faster and achieve stiffer peaks.
- Allow the pie to chill for the full recommended time; this is crucial for the filling to set properly.
Common Mistakes to Avoid
- Soggy Crust: Failing to blind bake the crust properly. Why: The filling moisture will make an unbaked crust soggy. How to fix: Blind bake the crust until golden brown and completely cooled before filling.
- Lumpy Filling: Not whisking the cornstarch and cocoa mixture thoroughly with the liquids. Why: Cornstarch and cocoa can clump easily. How to fix: Whisk thoroughly in a separate bowl before adding to the hot liquid, or strain if lumps form.
- Skin on Filling: Not covering the hot filling with plastic wrap. Why: Hot pudding exposed to air forms a rubbery skin. How to fix: Press plastic wrap directly onto the surface of the hot filling immediately after cooking.
- Overbeaten Whipped Cream: Beating cream too long. Why: It will turn grainy and eventually separate into butter. How to fix: Stop beating as soon as stiff peaks form; watch carefully.
Variations and Substitutions
| Ingredient | Substitution | Impact on Flavor |
|---|---|---|
| Semi-sweet chocolate | Dark chocolate or milk chocolate | Dark chocolate will yield a more intense, less sweet pie. Milk chocolate will make it sweeter and creamier. |
| Butter (in crust) | Vegetable shortening | Shortening can result in a flakier crust but with less rich flavor. |
| Milk | Half-and-half or a mix of milk and cream | Using richer dairy will result in an even creamier, more decadent filling. |
| Vanilla extract | Almond extract or a touch of espresso powder | Almond extract adds a different nutty nuance. Espresso powder deepens the chocolate flavor without adding coffee taste. |
Serving Suggestions and Pairings
This classic chocolate cream pie is perfect for any occasion, from family dinners to potlucks and holiday celebrations. Serve chilled slices on their own for pure indulgence. For an elevated dessert experience, pair it with a scoop of vanilla bean ice cream or a drizzle of raspberry coulis. A simple cup of coffee or a glass of cold milk also complements the rich chocolate flavor beautifully.
Storage and Reheating
| Method | Duration | Instructions |
|---|---|---|
| Refrigerated | 3-4 days | Cover the pie loosely with plastic wrap or aluminum foil. Store in the refrigerator. The whipped cream may soften over time. |
| Freezing | Not Recommended | The creamy filling and whipped topping do not freeze well and can become watery or separate upon thawing. |
Nutritional Information
Approximate values per serving (1/8th of pie):
| Nutrient | Amount per Serving |
|---|---|
| Calories | 450-550 kcal |
| Protein | 7-9 g |
| Fat | 25-35 g |
| Carbohydrates | 50-60 g |
| Fiber | 3-5 g |
| Sugar | 30-40 g |
| Sodium | 200-250 mg |
Frequently Asked Questions
Can I use a premade pie crust?
Yes, a store-bought pie crust can be used as a shortcut. Blind bake it according to package directions until golden brown before adding the filling.
How do I know if the chocolate filling is thick enough?
The filling should be quite thick and coat the back of a spoon, holding its shape for a few seconds when a line is drawn through it. It will continue to thicken as it cools and sets.
My chocolate pie filling is grainy, what happened?
A grainy texture often results from the chocolate seizing or the egg yolks scrambling. Ensure the heat is medium-low when cooking the pudding and stir constantly. Do not overcook after the chocolate is added.
Can I make this chocolate cream pie ahead of time?
Yes, the pie can be made up to one day in advance. Prepare the crust and filling, then chill the pie thoroughly before topping with whipped cream just before serving.
How long does chocolate cream pie last?
Once prepared and refrigerated, this chocolate cream pie typically lasts for 3 to 4 days. Store it covered to maintain freshness.
Indulge in the ultimate comfort food with this easy-to-follow chocolate cream pie recipe. The combination of a crisp crust, silky chocolate pudding, and light whipped cream is simply divine. Every bite offers a perfect balance of textures and a rich, deep chocolate flavor. Make this show-stopping dessert today and experience pure chocolate bliss!
PrintThe Ultimate Chocolate Cream Pie

Indulge in the ultimate chocolate cream pie, featuring a silky smooth, rich chocolate filling encased in a crisp, buttery crust. This classic dessert is a must-have for any chocolate lover, promising pure bliss with every decadent spoonful.
- Prep Time: 25
- Cook Time: 35
- Total Time: 60
- Yield: 8 servings
- Category: recipe index
- Method: Baking and Chilling
- Cuisine: American
- Diet: Vegetarian
Ingredients
For the Crust:
1 1/4 cups all-purpose flour
1/4 cup granulated sugar
1/2 teaspoon salt
1/2 cup (1 stick) cold unsalted butter, cubed
4-6 tablespoons ice water
For the Filling:
1/2 cup unsweetened cocoa powder
1/2 cup cornstarch
1/2 cup granulated sugar
pinch salt
3 cups milk (whole milk recommended)
4 large egg yolks
2 teaspoons pure vanilla extract
4 ounces semi-sweet chocolate, chopped
Instructions
Make the Crust:
In a large bowl, whisk together flour, 1/4 cup sugar, and 1/2 tsp salt.
Cut in the cold butter using a pastry blender or your fingertips until the mixture resembles coarse crumbs.
Gradually add ice water, 1 tablespoon at a time, mixing until the dough just comes together.
Form the dough into a disc, wrap in plastic wrap, and refrigerate for at least 30 minutes.
Preheat oven to 375°F (190°C).
On a lightly floured surface, roll out the dough to fit a 9-inch pie plate.
Trim and crimp the edges.
Line the crust with parchment paper and fill with pie weights or dried beans.
Blind bake for 15 minutes.
Remove parchment and weights, then bake for another 10-15 minutes, or until golden brown. Let cool completely.
Make the Filling:
In a medium saucepan, whisk together cocoa powder, cornstarch, 1/2 cup sugar, and pinch of salt.
Gradually whisk in the milk until smooth.
Cook over medium heat, stirring constantly, until the mixture thickens and comes to a boil. Boil for 1 minute, stirring.
Remove from heat. In a small bowl, whisk the egg yolks.
Temper the egg yolks by gradually whisking about 1/2 cup of the hot milk mixture into the yolks.
Pour the tempered yolk mixture back into the saucepan with the remaining milk mixture.
Return the saucepan to medium heat and cook, stirring constantly, until thickened, about 2-3 minutes. Do not boil.
Remove from heat and stir in the chopped semi-sweet chocolate and vanilla extract until the chocolate is melted and the filling is smooth.
Pour the hot filling into the cooled pie crust.
Cover the surface of the pie directly with plastic wrap to prevent a skin from forming.
Chill in the refrigerator for at least 4 hours, or until firm.
Notes
For a richer flavor, use Dutch-processed cocoa powder. Ensure the pie is well chilled before slicing. Store leftover pie covered in the refrigerator for up to 3 days.