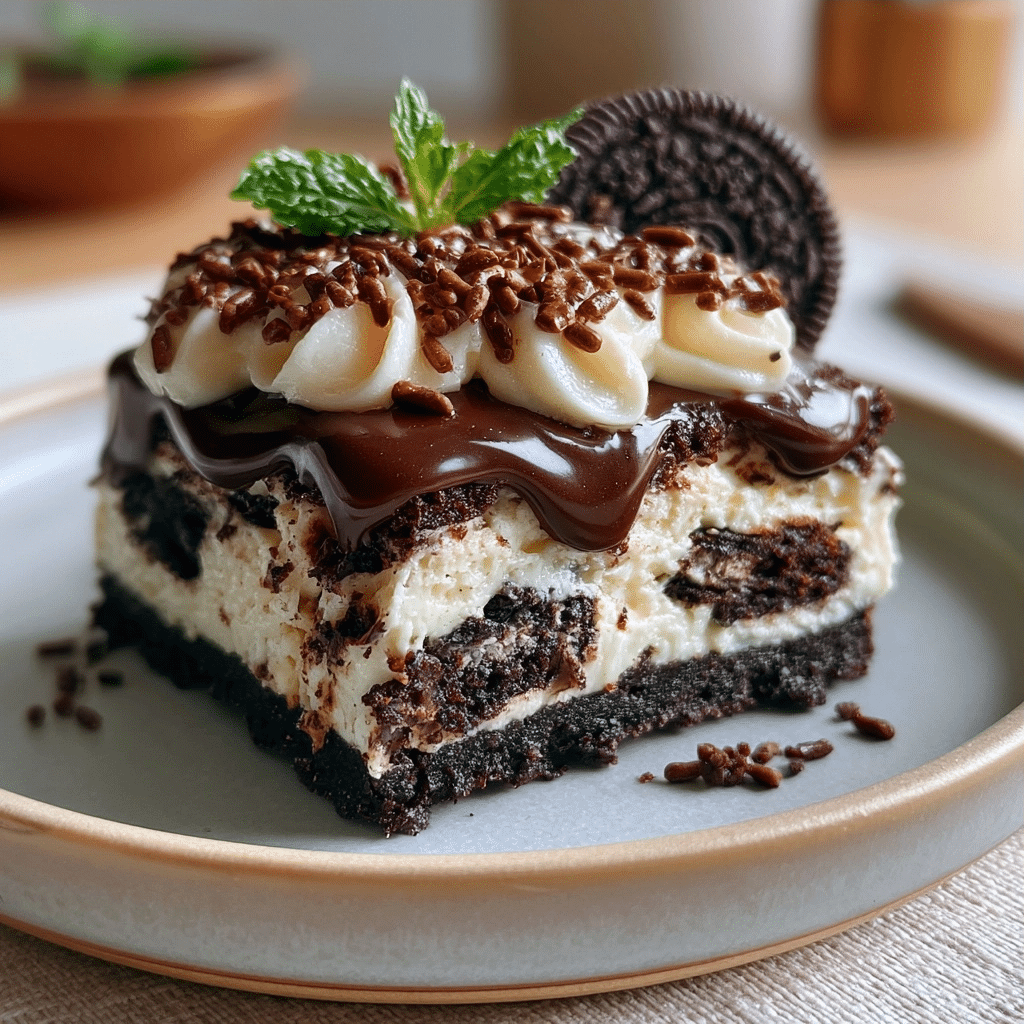
This No-Bake Oreo Dessert is a rich, creamy, and crunchy layered dessert that requires zero oven time. With a buttery Oreo crust and a luscious cream cheese filling, it comes together in under 15 minutes. Perfect for hot days, last-minute gatherings, or any chocolate craving.
| Prep Time | Cook Time | Total Time | Servings | Difficulty | Cuisine |
|---|---|---|---|---|---|
| 15 minutes | 0 minutes | 15 minutes + 2 hrs chilling | 8 | Easy | American |
Why This Recipe Works
This No-Bake Oreo Dessert has been my go-to for potlucks and birthday parties for years. The combination of crunchy Oreo crust and silky, not-too-sweet filling never fails to impress. Because it requires no baking, you avoid a hot kitchen in summer and save precious time. The filling stays light thanks to folded whipped cream, while the cream cheese gives it a tangy depth that balances the chocolate. Every spoonful delivers texture and flavor that feels indulgent yet effortless.
I love that you can prep it the night before and just pull it out when guests arrive. The ingredients are pantry-friendly, and the method is foolproof even for novice bakers.
Ingredients
| Ingredient | Quantity | Notes & Alternatives |
|---|---|---|
| Oreo cookies | 36 cookies | Regular or Double Stuf; gluten-free cookies work too |
| Unsalted butter | 1/2 cup (1 stick) | Melted; try vegan butter for dairy-free |
| Cream cheese | 8 oz | Full-fat for best texture; low-fat may soften too much |
| Powdered sugar | 1/2 cup | Or use 1/4 cup granulated sugar blended fine |
| Heavy whipping cream | 2 cups | Cold; coconut cream for dairy-free |
| Vanilla extract | 1 tsp | Almond extract adds a different twist |
| Extra Oreos for garnish | 4-5 cookies | Crushed or whole |
Step-by-Step Instructions
Prepare the Oreo Crust
- Place 36 Oreo cookies in a food processor and pulse until finely crushed.
- Pour crumbs into a medium bowl and add melted butter.
- Stir with a fork until all crumbs are moistened.
- Transfer mixture to a 9×13-inch baking dish.
- Press firmly and evenly into the bottom using a flat-bottomed glass.
Make the Creamy Filling
- In a large bowl, beat cream cheese with powdered sugar until smooth and no lumps remain.
- In a separate bowl, whip heavy cream and vanilla until stiff peaks form.
- Fold the whipped cream into the cream cheese mixture gently until combined.
- Spread the filling over the crust, smoothing the top with a spatula.
Chill and Serve
- Cover dish with plastic wrap and refrigerate for at least 2 hours (overnight is best).
- Before serving, crush extra Oreos and sprinkle over top.
- Slice into squares and serve cold.
Chef Tips for Perfect Results
- Use cold heavy cream straight from the refrigerator – it whips up faster and holds better.
- Press the crust with a measuring cup to ensure an even, compact layer that won’t crumble when sliced.
- Soften cream cheese to room temperature by leaving it on the counter for 20 minutes; cold cream cheese creates lumps.
- Fold the whipped cream into the cream cheese in three additions using a rubber spatula – this retains air and makes the filling fluffy.
- Chill for at least 2 hours, but 4–6 hours gives a firmer slice. For clean squares, use a knife dipped in hot water and wiped dry before each cut.
Common Mistakes to Avoid
- Over-mixing the filling: This deflates the whipped cream, resulting in a dense dessert. Mix only until no white streaks remain.
- Not chilling long enough: The filling needs time to set. Cutting too early yields a sloppy mess. Always wait minimum 2 hours.
- Using low-fat cream cheese: It contains more water, so the filling may become runny. Stick with full-fat block cream cheese.
- Skipping the butter in the crust: Without butter, the Oreo crumbs won’t stick together. Measure precisely – too much butter makes a greasy crust.
- Adding wet ingredients to dry: Always fold cream into cream cheese, not the other way. This ensures even incorporation without lumps.
Variations and Substitutions
| Ingredient | Substitution | Impact on Flavor |
|---|---|---|
| Oreo cookies | Chocolate graham crackers or gluten-free chocolate cookies | Less intense chocolate flavor but still tasty |
| Butter | Coconut oil (solid) or vegan butter | Slight coconut taste if using oil; neutral with vegan butter |
| Cream cheese | Dairy-free cream cheese (e.g., Tofutti) | Tangy flavor remains; texture similar |
| Heavy cream | Canned coconut cream (chilled) | Coconut undertones; excellent for dairy-free |
| Powdered sugar | Granulated sugar blended into fine powder | Same sweetness but may need extra blending time |
Serving Suggestions and Pairings
Serve this No-Bake Oreo Dessert chilled straight from the fridge. It’s a hit at summer barbecues, birthday parties, and holiday meals. Pair with a tall glass of cold milk or a scoop of vanilla ice cream for extra indulgence. For a special touch, drizzle with chocolate syrup or caramel sauce just before serving. This dessert also shines as part of a dessert bar alongside fresh berries or brownie bites.
Storage and Reheating
| Method | Duration | Instructions |
|---|---|---|
| Refrigerator | Up to 5 days | Cover tightly with plastic wrap or foil; keep away from strong-smelling foods. |
| Freezer | Up to 3 months | Wrap entire dish in plastic then foil; thaw overnight in fridge before serving. |
| Reheating | Not recommended | This dessert is best served cold; do not microwave or warm as filling will melt. |
Nutritional Information
| Nutrient | Amount per Serving |
|---|---|
| Calories | 350 |
| Protein | 5g |
| Fat | 20g |
| Carbohydrates | 40g |
| Fiber | 1g |
| Sugar | 30g |
| Sodium | 200mg |
Approximate values. Nutritional content may vary based on specific brands and substitutions.
Frequently Asked Questions
Can I use reduced-fat cream cheese?
No, reduced-fat cream cheese contains extra moisture and stabilizers, which can make the filling loose and difficult to slice. Always use full-fat block cream cheese for the best texture.
How do I know when the whipped cream is stiff enough?
Turn the bowl upside down – if nothing slides out, you have stiff peaks. The cream should hold its shape when you lift the whisk and form a peak that doesn’t droop.
Why is my filling runny?
If the filling is runny, you likely over-whipped the cream (turning it into butter) or added it too fast. Alternatively, the cream cheese may have been too cold. Fix by chilling the bowl in the fridge for 10 minutes and re-whipping gently.
Can I make this dessert a day ahead?
Yes, this No-Bake Oreo Dessert is excellent made a day in advance. In fact, the flavors meld and the crust holds better after 24 hours in the fridge. Just add the garnish before serving.
What’s the best way to cut clean slices?
Use a large chef’s knife, dip it in hot water, and wipe dry. Cut straight down without sawing. Clean the knife between cuts for picture-perfect squares.
This No-Bake Oreo Dessert delivers maximum flavor with minimal effort. The combination of crunchy Oreo crust and velvety cream cheese filling makes it a crowd-pleaser for any occasion. Try it once, and it will become a staple in your dessert rotation.
For more tips on whipping cream, check out Serious Eats’ guide to whipped cream and for nutrition calculations, VeryWell Fit.
PrintNo-Bake Oreo Dessert

A rich, creamy, and crunchy layered dessert with a buttery Oreo crust and silky cream cheese filling. Chill and serve for a no-bake, crowd-pleasing treat ready in 15 minutes.
- Prep Time: 15
- Total Time: 120
- Yield: 8 servings
- Category: recipe index
- Method: No-Bake
- Cuisine: American
- Diet: Vegetarian
Ingredients
36 Oreo cookies (regular or Double Stuf)
1/2 cup (1 stick) unsalted butter, melted
8 oz cream cheese, full-fat
1/2 cup powdered sugar
2 cups heavy whipping cream (cold)
1 tsp vanilla extract
4-5 extra Oreo cookies for garnish
Instructions
Place Oreo cookies in a food processor and pulse until finely crushed. Transfer to a bowl and add melted butter. Mix until crumbs are moistened. Press firmly into a 9×13-inch baking dish. In a separate bowl, beat cream cheese with powdered sugar until smooth. In another bowl, whip heavy cream with vanilla until stiff peaks form. Fold whipped cream into cream cheese mixture. Spread filling over crust, smooth the top, and chill for 2 hours. Garnish with crushed or whole Oreos before serving.
Notes
Use gluten-free or vegan Oreos for dietary restrictions
Substitute vegan butter or coconut cream for a dairy-free version
Chill for at least 2 hours for optimal texture
Store in airtight container in refrigerator for up to 24 hours