So you’re craving something chocolatey but you also don’t feel like turning your kitchen into a crime scene? Same. You want dessert energy with “I barely tried” effort. And that’s exactly where this Cottage Cheese Chocolate Mousse slides in like a hero wearing sweatpants.
Before you scroll away because you saw the words “cottage cheese,” relax. This isn’t one of those “healthy desserts” that tastes like regret. When you blend it right, cottage cheese turns into this super creamy base that basically whispers, “I’m protein,” while chocolate screams, “I’M THE MAIN CHARACTER.” And together? Yeah. It works.
Why This Recipe is Awesome
Let’s be real: most mousse recipes act like you have unlimited time, unlimited patience, and a personal assistant named Claude who separates eggs for you. Not here.
- It’s ridiculously easy. Blend, chill, eat. That’s the entire vibe.
- It’s high-protein dessert magic. You get chocolate mousse that actually fills you up a bit. Who knew?
- No fancy techniques. No tempering, no whipping egg whites, no “fold gently while facing Paris.”
- It’s pretty forgiving. Unless you do something chaotic like not blending it. Then it’s… textured. And not in a cute way.
Also, it’s idiot-proof. Even I didn’t mess it up. And that’s saying something.
Ingredients You’ll Need
- Cottage cheese (1 cup / ~225g) – full-fat = extra creamy, low-fat works too (but it’s slightly less dreamy).
- Unsweetened cocoa powder (3–4 tbsp) – the chocolate backbone. Don’t cheap out if you can help it.
- Sweetener of choice (2–4 tbsp) – maple syrup, honey, sugar, or a zero-cal sweetener. Choose your fighter.
- Vanilla extract (1 tsp) – makes it taste like “real dessert” instead of “I tried.”
- Pinch of salt – tiny amount, huge impact. Don’t skip it.
- Milk (optional) (1–3 tbsp) – only if you need help blending it smooth.
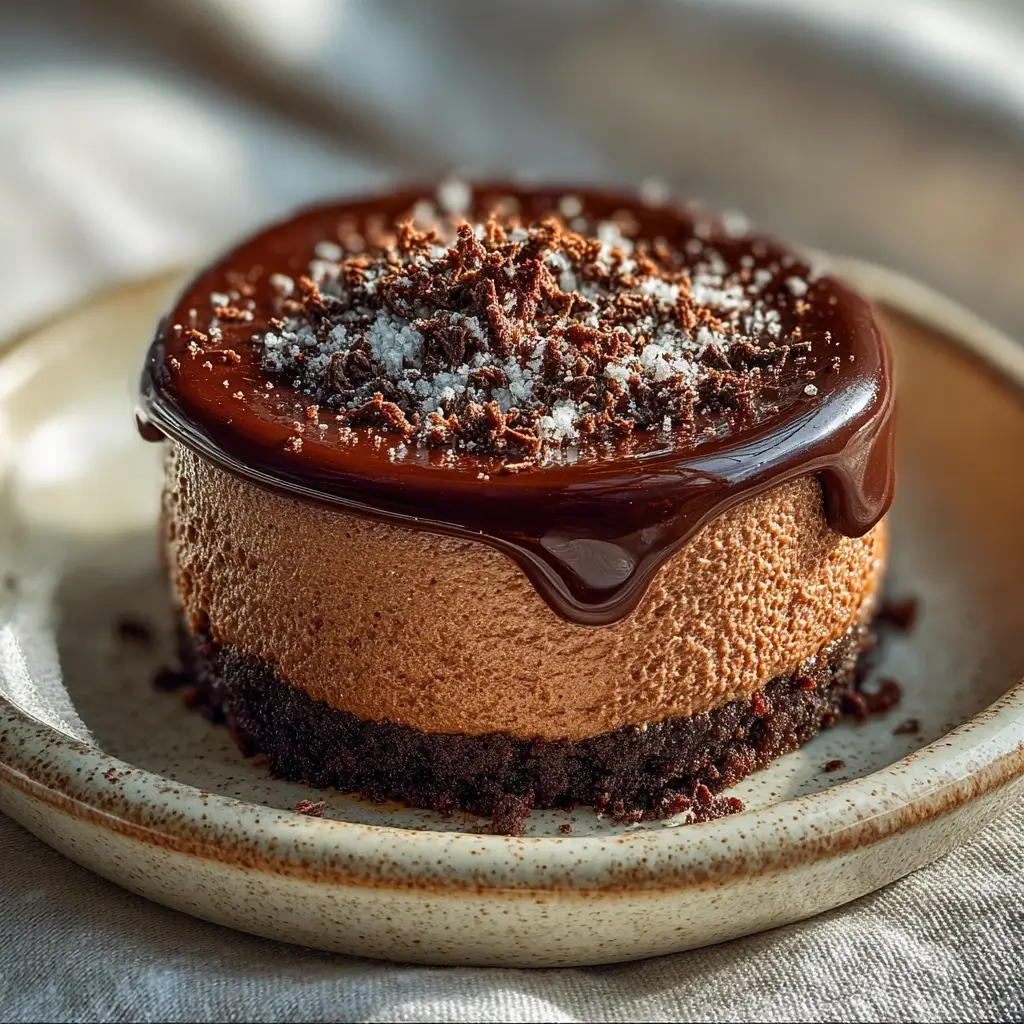
Optional toppings (because we’re not animals): whipped cream, chocolate chips, berries, crushed nuts, shaved dark chocolate, or a dramatic sprinkle of sea salt.
Step-by-Step Instructions
- Add everything to a blender or food processor. Cottage cheese, cocoa, sweetener, vanilla, and salt go in first. If your blender is weak and dramatic, keep the milk nearby for backup.
- Blend until it’s super smooth. Like, no bumps, no grainy vibes, no “is that a curd?” moments. Stop and scrape down the sides once or twice so everything actually gets blended (FYI, blenders love to hide cocoa powder in corners).
- Taste it and adjust. Want it sweeter? Add sweetener. Want it darker and richer? Add a bit more cocoa. If it tastes “too cottage-cheesy,” blend longer. Time fixes a lot here.
- Chill for at least 30 minutes. You can eat it right away, but chilling makes it thicker, silkier, and more mousse-like. Think of it as the dessert equivalent of letting a playlist “settle in.”
- Scoop into cups and top like you mean it. Add whipped cream, berries, chocolate shavings—whatever makes you feel fancy. Then grab a spoon and pretend you paid $9 for this at a café.
Common Mistakes to Avoid
- Not blending long enough. This is the #1 mistake. If it’s grainy, you didn’t blend. You merely introduced the ingredients to each other.
- Using chunky cottage cheese and expecting miracles in 10 seconds. Some cottage cheese brands are thicker than others. Give it time, and add a splash of milk if needed.
- Skipping the salt. “It’s dessert, why salt?” Because salt makes chocolate taste more like chocolate. Trust the process.
- Overdoing the cocoa without balancing sweetness. If it tastes bitter, that’s not “dark chocolate sophistication.” That’s you forgetting sweetener exists.
- Serving it warm-ish. It’s mousse, not soup. Chill it. Your future self will thank you.
Alternatives & Substitutions
- No blender? You really want one for this, but you can try an immersion blender in a tall cup. Just know it may take longer, and you’ll need patience and maybe a motivational speech.
- Swap the sweetener: Maple syrup gives a cozy flavor, honey makes it slightly floral, and regular sugar works if you blend long enough. Zero-cal sweeteners work too—just start small because some of them get loud.
- Make it extra rich: Add 1–2 tbsp melted dark chocolate. IMO, this takes it from “wow” to “who are you and why are you so talented?”
- Make it mocha: Add 1 tsp instant espresso powder. Chocolate + coffee = instant personality upgrade.
- Make it dairy-free-ish: Cottage cheese is the whole base, so fully dairy-free is tricky. But if you can find a plant-based “cottage cheese” alternative where you live, it might work—just expect the flavor to be a little different.
Cottage Cheese Chocolate Mousse

This Cottage Cheese Chocolate Mousse is ultra-creamy, rich, and secretly packed with protein. It’s a quick, blender-only dessert that tastes indulgent without the usual fuss. Perfect when chocolate cravings hit but patience is low.
- Prep Time: 5 minutes
- Cook Time: 0 minutes
- Total Time: 35 minutes
- Yield: 2 servings
- Category: Dessert
- Method: Blending
- Cuisine: American
- Diet: Vegetarian
Ingredients
1 cup cottage cheese (full-fat preferred)
3–4 tablespoons unsweetened cocoa powder
2–4 tablespoons sweetener of choice (maple syrup, honey, sugar, or zero-cal)
1 teaspoon vanilla extract
Pinch of salt
1–3 tablespoons milk (optional, for blending)
Instructions
1. Add cottage cheese, cocoa powder, sweetener, vanilla, and salt to a blender or food processor
2. Blend until completely smooth, stopping to scrape down the sides as needed
3. Taste and adjust sweetness or cocoa level to your preference
4. Add a splash of milk only if needed to help blending
5. Chill in the refrigerator for at least 30 minutes to thicken
6. Scoop into serving cups and add toppings if desired
Notes
Blend longer than you think to remove all graininess
Chilling improves texture significantly
Use high-quality cocoa powder for best flavor
Optional toppings include whipped cream, berries, or chocolate shavings
FAQ (Frequently Asked Questions)
1) Does this actually taste like cottage cheese?
If you blend it properly and use enough cocoa + sweetener, nope. You get a creamy chocolate vibe. If you taste cottage cheese, you either didn’t blend long enough or you used too little flavor. Fixable.
2) Can I make it ahead of time?
Absolutely. It’s even better after a few hours in the fridge. Make it the night before, then casually “discover” it later like a dessert genius.
3) How long does it last in the fridge?
About 3–4 days in a sealed container. Although, realistically, it lasts until someone in the house finds it.
4) Can I freeze it?
Yes, but the texture changes. It turns more like fudgy frozen dessert than classic mousse. Still good, just different. Not a tragedy.
5) Can I use Greek yogurt instead?
You can, but it won’t be the same. Greek yogurt makes it tangier and lighter. Cottage cheese gives that thicker, more “mousse-ish” texture. If you go yogurt, consider adding melted chocolate to keep it rich.
6) Why is mine runny?
Either you added too much milk, your cottage cheese was extra watery, or you didn’t chill it. Chilling fixes a lot. If it’s still runny, blend in a bit more cocoa or melted chocolate.
7) Can I make it sweeter without adding more sugar?
Yep. Try a ripe banana (adds sweetness + thickness), a few soft dates (blend well), or a zero-cal sweetener. Can you use margarine instead of butter? …Wrong recipe, but still: why hurt your soul like that?
Final Thoughts
This Cottage Cheese Chocolate Mousse is basically the dessert cheat code you didn’t know you needed. It’s quick, creamy, chocolatey, and secretly packed with protein—like a sneaky little snack with goals.
So go blend it up, chill it, and add toppings like you’re on a cooking show. Then take a bite and do that satisfied head-nod like, “Yep. I did that.” Now go impress someone—or yourself—with your new culinary skills. You’ve earned it.